Saturday, March 31, 2018

Scrapbook Layout "Let me count the ways" //Paige Evans stamps

Hi Crafty friends...I am sharing another layout created using the new stamp set from Paige Evans.  I was inspired by a layout Paige Evans created this this same stamp set where she stamped questions she asked her daughter and then the answers. 
The hot air balloon shape is actually the negative portion I cut from my Silhouette Cameo...  The inside of the hot air balloon was the cut file I originally planned to use, but figured the negative part was useable too! Don't thrown anything away!!
 
The words I stamped are all of the nicknames I use for my daughter....she isn't thrilled with all of my nicknames, but I am her mother and I think I am allowed! :)
 
These were all of the inks I used to stamp the words and as you can see, I wasn't limited to one brand of inks...I was choosing inks based on color alone.  This took me quite a long time, but completely worth it!!
 
 
Before adding my title, I really felt like something was missing, so I decided to stitch the outline in black thread...that it exactly what it needed!
My title was original going to be "Shyanne" which is her name, but decided the layout needed something more on the left side and didn't want to add more mixed media. 
The white foam letters and the small letter stickers in my title are from Pink Paislee Paige Evans "Pick me up" collection...I love these foam letters and I think I will have to buy another set soon....


A couple of years ago, my mother bought my daughter her own stamp with her name because there are never any stamps with her name with that spelling..however, it is a wood block stamp and I was very nervous about stamping this...I didn't want to mess it up after all of the other stamping I had already done!!


I filled in the empty spaces with hearts from Bella blvd, freckled fawn, & pinkfresh studio and flair from Cuts2Luv...I also added a purple heart flair from A flair for buttons by my photo. and of course....I needed to add some colored thread under my flair.


I "sprinkled" stars from Pink fresh Studio...I love their new puffy hearts and stars...I love all of the different sizes in the package and the texture and the colors...what can I say.. I love them!!
 
 
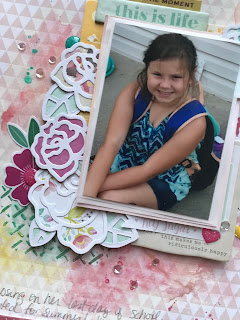
Around my photo, I added some watercolor paints from my Prima Confections set and layered my photo over some old frames from my stash and a paper bag I received some flair in...I keep all of those!
 
I struggled a lot with the bottom of my hot air balloon for some reason, but ended up with layering some pretty papers created by Irit with Hip Kit Club and stitched some "X's" for some texture similar to  a real basket....I really wanted to include one the tassels, and the end result is not what I had intended, but I am happy with the way it looks...I just wrapped some twine around the last bit of scrap from the same patterned paper and hung the tassel from that....check out my video linked below to see how I came to that result!  ideas are never perfect the first time and sometimes you have to make mistakes to get to some thing you like...
 
lastly, I added some sequins from Pretty Pink posh and some platters from the Prima watercolors ....I had a great time making this! I hope you like it too.  Please check out my YouTube video linked below...Have a great day!


Saturday, March 17, 2018

Scrapbook Layout "Heaven Sent"

Hi, crafty friends....I hope you are enjoying your weekend!
I have another scrapbook layout to share with you using the beautiful Pink Paislee Moonstruck collection...this is my first layout using this collection because I have been trying really hard to use my older stash, but I couldn't pass it up any longer....I love all of the colors in this collection and the patterns!!
 
I started with the title which is chipboard and I have had it for a very long time....I mean years and year...and I pulled it out to leave on my desk because I can see it and won't forget about it and as soon as I come across a picture that works with it, then voila!!
I also recently downloaded a bunch of free cut files over at Paper Issues and this moon & stars was perfect for this page!  I backed the moon part with the gorgeous dark butterfly pp and backed the open starts with the black & white striped pattern that was on the opposite side of the butterflies.
 
The background pp is perfect the way it is and I didn't add much to it except for some ink splatters & translucent embossing paste from Dreamweavers....it provides texture, but subtle and in the light has a beautiful shine.  I used it with one of my absolute fave stencils from Prima!
 

I added some gold stars from my stash as well to layer under the cut file stars.  For the white stars, I broke out my Shimmerz Blings and painted the outline of the moon and all of the stars on the cut file.  I love the shine!!
 The chipboard title is embossed with Ranger's Gold Tinsel embossing powder....you can't see it well in a picture, but the gold sparkle is beautiful!!! I love it the shine...but first, to provide a clean slate, I painted it with my Dylusions white paint....I used this instead of white gesso because the coverage it so much better and with gesso, I would have to add 2-3 coats...plus this paint dries so fast!
 
I used some of the clear stickers and pieces from the ephemera pack to layer around and under my photo.  I also used some feathers I had in my stash for a long time...I believe they are from an old Heidi Swapp collection...they are embossed already and you ink or spray them to reveal the embossed pattern...I have a few more, but I think I will be able to use them up with this collection since there are already feathers included.
 
I finished up my layout with some puffy hearts from Freckled Fawn & Pink Fresh Studio as well as some gorgeous clear sparkly jewels from Lucy's Little Things...
 

I am so pleased with the way it turned out and I have to say it is a little simpler than a typical layout of mine.  I wanted to add so much more because all of the pieces in this collection are beautiful, but I am glad I stopped when I did....because you don't have to add everything to one layout, right??
 
Thanks so much for stopping by! If you'd like to see my whole process, please check out my YouTube video linked below...
Have a great weekend!!

https://youtu.be/_gJOPUABC6M

Wednesday, March 14, 2018

Simon Says Stamp Wednesday Challenge


Hi, crafty friends...I am back to share an Easter card I created for this week's Simon Says Stamp Wednesday challenge.  The theme is Easter and the suggestion or products is for "Your Next Stamp".  Unfortunately, I do not have any of their products, but I do have a ton of Easter related products.
 
I started with a piece Bristol smooth cardstock and embossed cute little stacked eggs from a Darcy's stamp set...the company that offers matching flair buttons for their stamps..?
The stamp set image is just three eggs stacked and I covered the background with this one stamp set.  After embossed with white embossing powder, I used my super awesome Clarity Stamp ink brushes to apply my Distress Oxide Inks.  I used these brushes as opposed to the ink blending tools because you can get such soft beautiful results with these brushes...love them! And because distress oxide inks are so easy to blend, this background was really easy to make!


I layered a piece of vellum to add my title to so it would stand out and not cover all of the cute little eggs in the background.  The sentiment is from the same stamp set and I embossed it with white embossing powder. 
 
I finished the card with some beautiful matching sequins from my stash and Pretty Pink Posh.
 
I hope you find some inspiration in my card!  Thanks for stopping by!


Saturday, March 10, 2018

Simon Says Stamp Monday Challenge

 
Happy Saturday,Friends! 
I am sharing a card I created with some new products for

Simon Says Stamp Monday Challenge.
Each week, Simon Says Stamp creates new challenges on Mondays and Wednesdays for all to participate...usually, there is a theme and a mention of a specific brand.
And...a random winner is chosen to receive a $50 gift from Simon Says Stamp...
What an incredible prize, so why not try....?
 
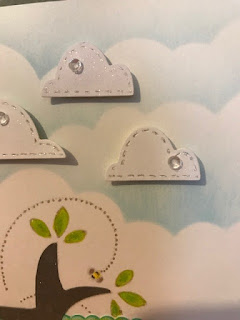
This week's Monday Challenge is "Whatever the Weather" and Tim Holtz products are being showcased....I do have several Tim Holtz stencils, dies, and inks of course...and I really wanted to try and incorporate some of the less obvious products, but I received this new stencil from My Favorite things and really want to use it so I used Tim Distress Oxide "Salty Ocean with the stencil...and what better background for "whatever the weather" then a cloud background?


I cut clouds from Wplus9 "sending sunshine" die set and added some Nuvo shimmer plus I used my gel pen over the faux stitched lines. 


I used Pretty Pink Posh "scalloped borders" to create my grassy hills and layered them at the bottom and stamped the tree & bees with a stamp set from a set from Gourmet Stamps.  I colored the image with my Prismacolor pencils and added some glitter with the Nuvo shimmer pen and my favorite gel pen.  I stamped and embossed the sentiment with Ranger platinum embossing powder.


To finish the card, I added some 3mm clear sparkling sequins from Pretty Pink Posh scattered around the card.
 
I hope you enjoy and found some inspiration from my card!
Thanks so much for stopping by.
Have a great weekend!


Paige Evans Collection & Cutfile "Life doesn't have to be perfect to be wonderful"

 
Hello crafty friends....sharing another layout I created using Pink Paige Evans Oh MY Heart collection and one of Paige Evans cut file for my Silhouette Cameo....I love this title and doesn't it sum up so many things in life...especially "mom life" which is referenced a few times in this collection!
 

I backed all of the words with different papers and love the impact it gives...I layered it on top of white cardstock which I added some Shimmerz and Heidi Swapp paints by smooshing it with some plastic packaging....love this technique...so easy and provides a beautiful look!!


Since the title was so large and colorful, I kept the embellishing to a minimal just using some of the die cuts from the collection and stickers from the sticker book...oh how I love that sticker book!

 
Thanks so much for stopping by! I hope you enjoyed the pictures and found some inspiration in my layout.  For the whole process, you can check out my process video on YouTube linked below...
 

Sunday, March 4, 2018

Scrapbook layout "Spring Time Sunshine"

 
Hello friends...Thanks for stopping by....
I am sharing a layout I created recently using my stash....a very old Basic Grey collection...yes, Basic Grey...how sad they are gone....
I still have some of their products and still love it!
I started with a cut file from Paige Evans and I had already printed these pictures out small and though it was a great way to showcase them in the cute little polaroid areas..
I love the way it drapes across the page over this beautiful watercolor patterned paper from the collection.  I backed the other spaces with matching patterned papers.
 
 My title consists of a puffy sticker from Pink Paislee and the "spring time" is fussy cut from an old strip of paper and honestly, I can't recall where it came from, but have held on to it for years just for this layout!
 
 In the spirit of using my stash, I pulled out a bunch of dragonfly and tiny butterfly brads and scattered them all over the page.
 
 
The "butterfly in the sky" sentiment is also from the same collection the "spring time" is and although I already have a title, I couldn't imagine after all these years that I would have another perfect layout like this one to add it to....so, two titles...and that is ok with me!
 
I used a couple of wood buttons from my stash an added a flair button from Cuts2Luv and finished the layout off with some puffy hearts from the new Pink Fresh Studio The mix 2 collection.
 

 I love the way this turned out!! I hope you do too and find some inspiration of your own!
I did not record this layout process, but if you have any questions regarding this layout, please let me know and I will get back to you right away. Thanks so much for stopping by!
Have a great day!


Stash busting Layout "Enjoy the Sunshine"

 
Hi, crafty friends....I wanted to share another layout with you using my stash.  I used the Dear Lizzy 5th & Frolic collection and a cut file from the Silhouette store.
 I backed all of the flowers with the pretty papers and layered around my picture and the top and bottom embellishment clusters.
  
 
I created the background with my Shimmerz paints and paste.


My title consists of puffy stickers from Dear Lizzy and Authentique alphas which I used my sewing machine to stich to may layout.


I used brads from the same collection as well as flair from Cuts2Luv etsy shop.


I finished the layout with some hearts from Bella Blvd and sequins from pretty Pink Posh.
 
Thanks so much for stopping by! I hope you found some inspiration in my layout! To watch the whole process, check out my YouTube Video linked below...

February 2018 Layout Share

 
Hello friends...Thanks for stopping by!
Below are some of the layouts I created recently for several reason and did not record process videos for them, but still wanted to share them with you.
 
The first three are layouts I created to submit for the Simple Stories design team call.  Unfortunately, I wasn't selected this time, but still enjoyed making them anyway! maybe next time...I have had so much funs digging in to my stash lately and fell in love all over again with the older SS collections!  You may recognize them...
 
The first one is of my daughter and this collection is filled with so many empowering words and positive affirmations and thought it was appropriate for my daughter....I also included some white cut files from Wilna Furstenburg and Jen Schow.  I left them white because there was already so much color and I think they pop.  I finished it off with some puffy stickers from Freckled Fawn and Maggie Holmes.


The second one is one of favorite SS Collections, Vintage Bliss!  I have so much still in my stash including all of those brads!!  I added some circles in the background with my gelatos, then began poking....It felt so good to use all of these brads....do you have a big brad stash?? use em up!!
I finished the layout with some sequins from Pretty Pink Posh and my title is from a Maggie Holmes sticker sheet.
 
This next layout is also from the Vintage Bliss collection and I used a cut file from the Silhouette store.  This technique isn't anything new, but timeless....when a collection has so many beautiful patterned papers, it makes sense to back all of the hearts with them.
The background was created my Shimmerz and Heidi Swapp paints used stickers from Maggie Holmes to embellish and my title. 


The last Simple Stories layout is of my parents and decided to create a grid layout because I had so many of the 4x6 cards left.  I love the way it looks...finished it off with some puffy flower stickers from 1Canoe2.


The next three layouts are using Pretty Little Studio products...love the colors in their collections! The first one is of my husband and me on a date night....I backed all of the flowers in the Silhouette cut file with their gorgeous pp and then backed the lo with black cardstock for contrast....so pleased with it.  all of the products on this layout is from PLS except for the sequins from Pretty Pink Posh and puffy stickers from Bella BLVD and Freckled Fawn.


The next layout is one of my faves....since Pretty Little Studio papers are only available 8X8, you have to come up with creative ways to create layouts.  I cut the pretty papers in to squares and used my sewing machine to sew vertically and horizontally.  Two of the squares I used their vellum paper to create mini shaker pockets...then I layered some of their die cuts and stickers to finish the layout.  
 
The next layout I used a cut file from Paper Issues and submitted for one of their challenges.
I love the way it turned out....I finished the layout with some hearts from Doodlebug.


This layout is using a Silhouette cut file  cut from white cardstock and Cocoa Vanilla studio products...I had a great time coloring the wreath with my Shimmerz paints, then I popped it up on fun foam.  I used stickers from the same collection and a wood veneer from Michaels to use as my title.  I prepped with gesso then painted it to match.
 
This layout I dug out a bunch of flowers from my stash I had created with my own stamps and dies....I love the way it turned out and that I as able to use them up!  Anyone can create their own embellishments for their crafty projects with dies and stamps...and plus, you can customize their color to fit any color scheme!!

 
This is an oldie, but goodie....this Kaisercraft collection is several years old and this layout pretty much busted through it!  I used the branding strips to layer across the top and then machine stitched through them.  I cut out the large camera and photo strip from a 12x12 paper and popped it up on fun foam.  The long title I created from Dear Lizzy, Maggie Holmes, and freckled fawn products.  I finished the layout with flair from The Flair shop, Maggie Holmes stickers, wood veneer from Hip Kit Club.


The next layout I created after watching on of Paige Evans Big Picture Classes.  I wont go in to too much details because you should check out the class for yourself, but I enjoyed watching Paige Evan's classes!


This last layout is another layout using Cocoa Vanilla Studio products.  I created the background with a Tim Holtz stencil and Distress Oxide ink and Shimmerz paints...love it!!
The hearts were cut on my Silhouette and I had so much fun layering them with all of the beautiful die cuts from this collection.  The title is stitched down with my sewing machine and I am so happy with the way it turned out!

 
Thanks so much for stopping by!  If you would like to hear more about these pages, you can check out my layout share video linked below.  Have a great day! 

December Kit share - My Creative Scrapbook Kit Club/main Kit

Hey my friends....Happy new year!! I realize this post is a little late, but I have been spending time with my family and working on new co...