Friday, January 26, 2018

Simon Says Stamp -Wednesday Challenge

Happy Friday friends....so, as I explore the challenges and opportunities to get involved in the crafting industry, I came upon the Simon Says Stamp challenges....not that I just stumbled upon SSS...because, I have been shopping there for years! however, I had no idea that they shared challenges each week on Monday & Wednesday....I can do that.... and someone is selected to win a $50 gift certificate to Simon Says Stamp! Woohoo!!
although, after researching the gallery...it is not an easy task I'm sure...there are so many entries and the cards submitted are fantastic...but you can't win or get noticed if you don't play, right?
so, as they say, I am playing along to through my hat (or card) in the ring. :)
For this week's Wednesday Challenge, Concord & 9th products are being spotlighted and the challenge is to "layer it up".  Now, I have to admit, I do not have that many Concord & 9th products, not because I don't want them, because I absolutely do!!!  What do I have is the plaid background stamp and I love love love this!! 
I first saw it on a Jennifer McGuire video....now that I think about it, I purchase a lot of products lately because I saw them featured in one of her videos which means she is doing her job well, right?  She does a great job and certainly inspires me and then leaves me wishing I had what she has...then, before you know, I am searching for it. 
This stamp, I cherish because it took me quite a while to even find...it was sold out everywhere!! and sadly, SSS didn't have it, but I finally found it at Impress Cards...thank goodness...I was so happy when I received it, I had to start playing...
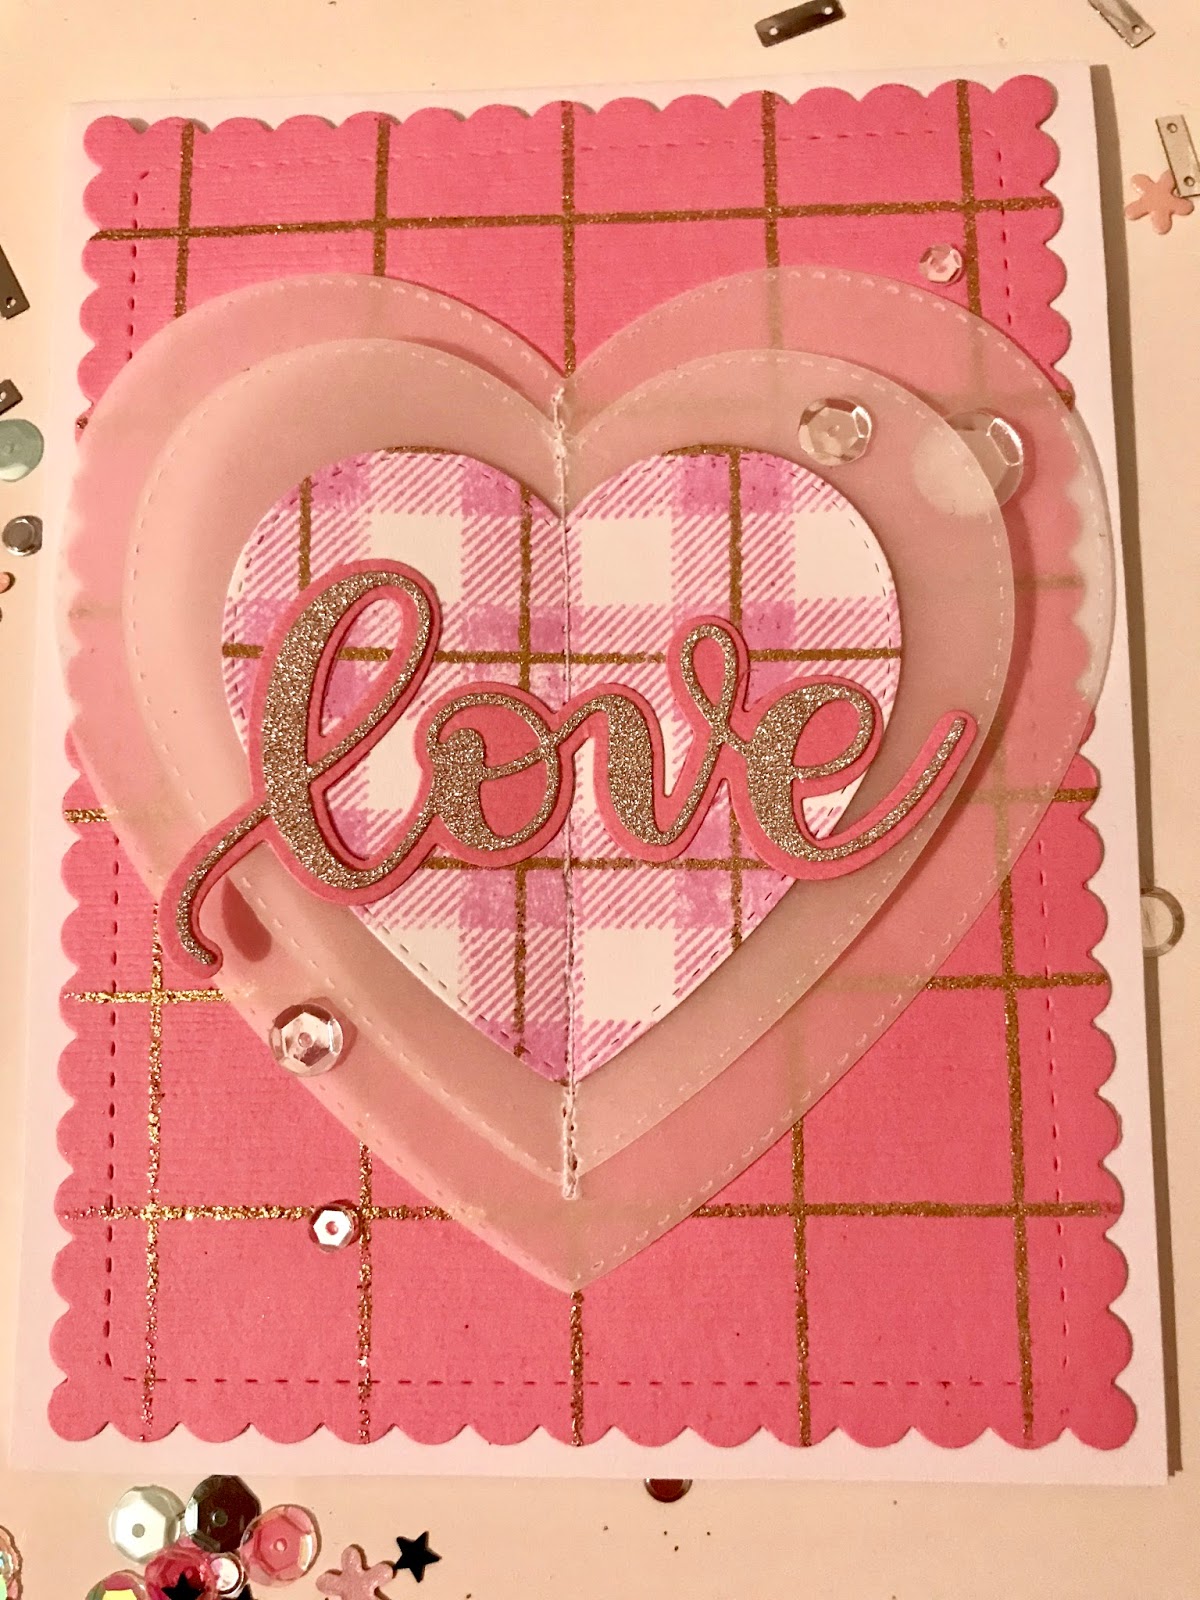
back to the details of the challenge & my cards....Below, I used the plaid stamp to create my base with my (also new) Altenew inks...The line of the plaid image is embossed with Ranger's Gold Tinsel and I love the glittery finish of this embossing powder!  The pics really don't do it justice.
I used a new die set I received from Kat Scrappiness to cut out the heart...this set has multiple hearts with a inside & outside faux stitch edge...love it! I popped up the base to create a shaker window inside that heart with pretty pink posh sequins, SSS sequins, and some tiny hearts I had in my stash.
To allow the die cut sentiment to stand out, I layered vellum heart behind it cut with the same die set as the shaker window.  The love sentiment is from a Simon Says Stamp set and I finished the card off with the sequins from Pretty Pink Posh.
 
 Below is the second card I created.....I used the same plaid stamp to emboss the gold tinsel lines and die cut that base from a Lawn Fawn stitched rectangle die set.  I layered vellum hearts cut from the Kat Scrappiness die set and I stitched with my sewing machine down the center.  The top layer is the heart I cut out from the first card.  The sentiment is a layered die set from Simon Says Stamp. 
I finished the card by sprinkling some sequins from Pretty Pink Posh.

For the challenge, you can only submit (5) and I had a hard time picking because I also received a long awaited and cherished die set from Birch Press designs....the layered die set creates a beautiful pattern...and I have this pattern throughout my entire house, so of course, I had to have it!!
I also saw this for the first time in a Jennifer McGuire video! I spent hours with my paper stash bin just cutting dozens of pieces to layer and make cards...some of the color combos are not my typical style, but I put a huge dent in my paper scraps. 
 I cut more of the middle size heart dies from vellum to layer under my sentiment and even though these cards do not include Concord & 9th products, they definitely have the "layer it up" covered!!
The yellow and black card and the purple and mint cards have sentiments embossed from Honey Bee's Sending you stamp set. 
 Below, I used the same products to create more cards, just different color combinations...the little hearts that I added are from a Simon Says Stamp tiny hearts die set.  I tried to mix up the placement of the hearts and sentiments to keep them interesting and I love the way they turned out!
The sentiment is embossed with a stamp from Altenew.


Thanks so much for stopping by to check out my latest cards...If you are interested in more information on any of the products I used, please contact me and I will be happy to respond as soon as possible.  Do you have any faves???  I'd love to know your thoughts.
Have a great day!!

Wednesday, January 24, 2018

Scrapbook inspiration.....

Hello all...I hope you are having a crafty day....I have been reminiscing lately and looking back through some of my fave layout...and thought I'd share with you...
what are you faves?? I'd love to hear!


Thanks so much for stopping by...if you are interested in knowing more details about any of these projects, please contact me and I will be happy to provide more info!!

"Smile" 12x12 layout

 
Hi, crafty friends...Thanks so much for stopping by for another project!  I started this layout with the intention of documenting my goals for 2018! Use my stash, use more photos of me, and start sharing my work with others, are just a few....So, in the spirit of that, I dived in to my stash of homemade embellishments to create a very colorful layout! You can never go wrong with a rainbow color scheme, right??
The embellishments are a mixture of painted wood veneers, die cuts, stamped images and puffy stickers from various brands.  If you are interested in a specific color I used or embellishments, please leave a comment below and I will get back to you asap.  There were too many to try and list to this post. 
I started with piece of Bazill cardstock with gesso and started spraying!  I think I went a little overboard since the embellishments will already add color, it didn't need so much color on the background, but in the end, I am happy with it. 
I really hope you find some inspiration from this layout and if you would like to see the whole process, check out the link to my YouTube video below.  Thanks again for your support.


check out this video.... :)


Wednesday, January 17, 2018

Oh So Cold scrapbook layout

 
Hey crafty friends...thanks for stopping by...today, I am sharing my recent layout of my daughter posing for the camera on a chilly day! I used the infamous Snow & Cocoa collection...


I hope you like the photos and find some inspiration...check out my YouTube channel for the process video -
https://www.youtube.com/channel/UCVvawKMiIiJHxloZAu44jEw
Have a great day!!

New Simon Says Stamp Friends Release....so much fun!!

Hi, crafty friends...Thanks for stopping by...I want to share with you the recent cards I created using new products from Simon Says Stamp!  They were included in their latest release and my most fave is the "Center Cut Heart" stamp!  I love the cut out in the middle and I had such a great time creating these cards..so many possibilities!
You can click on the below link to purchase this stamp set....
 
so, for my first card....I heat embossed the image on vellum with the Ranger Gold Tinsel embossing powder...I love this embossing powder!! The pictures don't do it justice because it is so glittery ...
 love love love....
 
For the background, I knew I wanted to create a mixed media background and I used my Shimmerz paints to create the below background..However, after placing it under the vellum, it wasn't quite bright enough so I use this for another card shown below.

 Then, I created this background with my Distress Oxide inks....yes, I know this isn't anything new, but this doesn't get old at all!! playing with these inks makes me smile!

Below is the card I created from the first background...I stamped the heart from the Simon Says Stamp with Ranger Silver embossing powder, then used my Prima pastel confections watercolors to color it. Last, I embossed the sentiment with Ranger white embossing powder.  The sentiment is from the Altenew Beautiful Day stamp set...I am so happy with the way this turned out.

 This is the finished card using the embossed vellum and second background I created with the Distress Oxide Inks...I finished it with a popped up banner and embossed it with a sentiment from the same Altenew stamp set with the same Ranger gold tinsel and added some Pretty Pink Posh sequins....this is my fave of all of the cards I created!!
 
For the card below..I actually started with embossing the heart on cardstock, then colored it with my Prima watercolors...however, it was missing something...so, I cut those out and added a black base to my card which is exactly what it needed...the contrast is awesome!  I finished it with a heat embossed sentiment from a Spellbinders stamp set and used my white jelly pen to make the little dots on the background...I got this idea from a video Jennifer McGuire did a while back...it adds just enough detail to complete the card!
 This card, I embossed the Center Cut Heart background stamp with black Versamark and clear embossing powder....then, I colored the image with Prima Metallic watercolors.
The sentiment is from a Honey Bee "Sending You" stamp set and heat embossed on a popped up black strip.  all of the colors are beautiful....there are so many possibilities for color combinations and each would look awesome with this stamp set!
 This card, I heat embossed the stamp image  and trimmed to create a vertical design card and colored it with my Prima pastel confections watercolors.  The sentiment is (4) layers of cardstock on top of a strip of vellum....I wanted the top layer to match the card, but without the vellum, it competed too much and the vellum makes the sentiment pop!  I love this Thank you die...unfortunately, I cannot recall what brand it is...ugh....Since documenting my projects, I have started organizing and labeling all of my products, and for this die, I have searched all of my previous orders and cannot find where I bough this... I even did a google search for it...and no luck...so, if anyone recognizes it, please, please, notify me...I'd love to find out for my own curiosity of course, but also to credit the maker of the die.
 This card is super simple compared to the ones shared above, but still love it...I heat embossed just the center heart with Ranger's gold tinsel and attached my panel to a pink notecard.
The sentiment is from an old stamp set from Lisa Hetrick and heat embossed with that same embossing powder. Simple, but sweet....what do you think???
Thanks for checking out my latest projects!  I really hope you enjoyed the photos and find some inspiration....also, check out the stamp set at Simon Says Stamp and all of the new products in their latest release!
Have a great day!!
 
PS...I am a little knew at creating posts and have not figured out how to link products and/or other websites....I apologize for the inconvenience and hope to be able to do so soon!

Thursday, January 11, 2018

Celebrate Sweet Moments 12x12 Layout

Hi, crafty friends..Thanks so much for stopping by to check out my latest project!
Today, I am sharing another scrapbook page layout of my sweet little girl who was eating an ice pop.
I started out with a paper from Simple Stories and prepped it with gesso so I could add some watercolors....and so I could blend out some of the print in the background.
The watercolors I used were from Prima pastel confections, Jane Davenports and Shimmerz.
I started this layout in this color scheme because I really wanted to use the bright pink flower and camera from a Hip Kit Club kit I ordered...for some reason, I had a really hard time incorporating in a layout before now and honestly, it really doesn't match my photo, but I think it works and I am really happy with the final layout!
I also used some scraps from SS as well as some papers to matt my photo from Pretty Little Studio and Heidi Swapp.
I used a cut file created by Jen Schow and painted with my watercolors...I had a mental debate whether to back it with vellum or paper, but decided not to...what do you think??
Some of the little banner stickers were from an old Kaisercraft collection that I was happy to break out....because, afterall, I am on a mission to use my stash!
There's that camera I was mentioned above and I love the way it contrasts with the doily die cut behind it...I also painted that with my watercolors.
The banner sitting on top of the camera is from Pretty Little Studio as are the little pink hearts scattered about the page....
The Blue popsicle came from Freckled Fawn is the 2nd popsicle I ended up because the 1st was a fail...If you check out my process video below, you can find out more about my trial and error!
The one that made it to the page looks good though...it was a wood veneer and I painted it with my watercolors from Prima.


I layered some flair over pink thread and a "homemade" embellishments consisting of what I like to call mixed media circles...I took a page out of Missy Whidden's book and made a mess on a clean sheet of cardstock and used my circle punches..(yes, I meant punches!) which I have a ton of, but sadly they don't get enough use, however, I keep my simple shape punches close for this easy technique...thanks Missy for reminding me of how useful our old supplies can be!


 When I started this layout, I had intended for the cut file "So Cool" to be my title, but after I was done, it still seemed like something was missing...so I decided to create another title to the right with a Little Yellow Bicycle stamp set with fantastic sentiments....I thought to myself ..." why don't I use this more often???" so I broke it out and stamped my sentiment! The "Sweet" part was from my Amy Tangerine letter stickers and I love the way it looks!
You can check out my process video from YouTube below....
 
Thanks so much for your support and checking out my blog!  I hope you enjoyed the pics of this layout and that you found some inspiration.
Have a great day!


Tuesday, January 9, 2018

Beach Mini Album

Hi, crafty friends! Thanks for stopping by to check out my new project.
I created this mini album for our Myrtle Beach family vacation from 2016...I know..I know....that was over a year ago, but how many of us are scrapping current events...?
It took me quite some time to finish, but I am really pleased with how it turned out....I took a little hiatus from scrapbook layouts to catch up on mini albums I had planned to make and below is one of them...I hope you enjoy and find a little inspiration to create your own mini album!
 The cover includes an embossed shipboard title on a piece of acetate.  I bound the album with two rings and attached several ribbons and charms. The piece of acetate is from a Heidi Swapp collection.
 Because I have a hard time editing my content, I decided to go with a different application than the typical binder. I added eyelets to the front and back covers, then tied looped ribbons for a lobster clasp to attach to.  I found this adorable clasp on etsy.  Love it!!

 The papers and embellishments I used primarily came from the Simple Stories collection's I heart Summer & Good Day Sunshine including the die cut page above. I backed it with vellum as to avoid anything catching on the pages before and after.
 The "bliss" insert is from a Heidi Swap collection and I added washi tape to add color and texture.
 The folded page is held with a small binder clip and hides some of the small photos and journaling.  I wanted to create different types and interactive pages to keep the album interesting from beginning to end! The below pic is the inside.
 "The Good Life" page insert below is another Heidi Swapp piece.

 This picture is of my husband feeding the ducks which I backed with a project life card and stitched around.
 The pocket I created is from vellum which is attached with stitching from my sewing machine and it holds a couple of smaller project life cards that I added photos to on the back.  It also holds a tag for journaling and a folded card I created that opens up to more photos. 
 Below is a pocket page protector that I stitched closed after I inserted glitter, small embellishments, and even some small shells that we found on the beach.  Even as my daughter, Shyanne/9yo, gets older, she still gets excited to collect shells with us and when we get home, we paint and decorate them.  We have a large collection and I enjoy that crafty time with her!
 Below is another acetate page I stitched photos to...can't have a beach album without pics of the beach...right?

I love all the different size and type of pages...it makes each turn of the page unpredictable! Below on the left is a tim holtz pocket page that comes with his journal and on the right is a small page insert from Simple Stories.  I added washi tape to all of the different pocket pages because I had to repunch the holes to fit my album.
 Below on the right is a paper bag I received embellishments in from an online order and we, scrappers, don't throw anything away, do we..? not when it can be repurposed! It worked perfect to hold card that I attached a photo to. On top of the bag, I embossed chipboard starfishes with stampendous texture powders...it was a kit that including coordinating embossing powders and fragments...the texture was perfect for a beach theme...
 Below is the insert that I included in the striped paper bag.
 Below on the left is a die cut embellishments from Simple Stories that I backed with vellum and stitched closed after inserting some sequins.
 The below page was a precut banner from SS..and the pic is of my dad starting one of his famous sandcastles....At the beach, he becomes one of the kids as he breaks out his regular shovel and starts digging...He is a remodeler, and he enjoys building and it definitely shows when he starts playing in the sand.

 Below on the right is another acetate page and on the right, I sewed a pocket and created a little book with more beach photos..


 below on the right is a folded page held closed by a pink paper clip..
 
 
Below on the right is SS premade pockets, which I tucked photos and journaling in..
 We also see the pirate show at the beach each year and I took a portion of the brochure and stitched to the front of a little book I created...inside are more photos and journaling...


 The page on the right I stiched sections into a 6x8 pocket page...yes, I know there are ones already created out there, but I didn't have any at the time, so I made my own, which was challenging, but I absolutely love how it turned out!!


Thanks so much for checking out my mini album....I hope you enjoyed the pics and found some inspiration...you can check out my video of this album on YouTube as well.


December Kit share - My Creative Scrapbook Kit Club/main Kit

Hey my friends....Happy new year!! I realize this post is a little late, but I have been spending time with my family and working on new co...