Tuesday, August 21, 2018

"Love, Home, Family" Scrapbook Layout //Butterfly Reflections Ink DT

Hi, crafty friends....I am back with another a scrapbook layout to share with you for the Butterfly Reflections Ink design team...I had a great time making this and hope you like it too!
 
The picture is of myself, husband, and daughter and I love the Pink Paislee Auburn Lane collection with it!  I started with a piece of white cardstock and really wanted to play with my new Shimmerz Paints because they match this collection so well.  I used the paints on the background and the  cut file title I cut on my Silhouette. Specifically, when skies are grey, so sappy, pip-pip cheery-o, and sage it isn't so. I got the title from a file available for free on the Hip Kit Club website and the circle is from 17turtles/Juliana Michaels blog.
 
 
I matted my photo on a couple patterned papers from the 6 x 8 paper pad and popped it up on some adhesive foam.
 
 
To add texture, I machine stitched my title and the circle cut file to the background. 
 
 
 To embellish my layout, I used the cute little puffy stickers, rub ons, and stickers from the 6 x 8 sheet of accent stickers.  To back the embellishment clusters, I used a couple of pieces from the cut apart patterned paper from the paper pad.
 
 
Lastly, I tucked in a few of the vellum gold flower die cuts from the Floral Ephemera.  I love those flowers and there are so many included in the pack!!


Thanks so much for stopping by and I hope you are inspiring to get a little messy on your next project!  I'd love to know what you think.  Please feel free to leave a comment or question and I will get back to you as soon as possible. 
Make sure you head to the Butterfly Reflections Ink shop now to take a look at all of these goodies and all of the new stuff being added everyday!!
Have a great week!
 

Tuesday, August 14, 2018

"DWTS" mini album //Butterfly Reflections Ink DT ///Paige Evans cut file & collections

 Hi,  crafty friends! I have a mini album to share with you for the Butterfly Reflections Ink store....I used a Paige Evans mini album cut file with a collection of products from Pink Paislee Paige Evans.  I created the album for pictures taken at a Dancing With The Stars Live show earlier this year. It was super fun and had too many pictures for just a scrapbook layout! Using the cut file made it easy to create the album and Paige Evans provides a helpful tutorial on her YouTube page. 


To embellish the front, I used a combination of Pick Me Up ephemera and alpha stickers from my stash.  The flair is from an etsy shop called Cuts2Luv and she has beautiful flair pieces.
To enclose the album, I glued a piece of twine around it and also adhered tiny velcro circles from my stash. 
 
 
To make the base of the album and tags, I used Pink Paislee Take Me Away 6 x6 paper pad and the Pink Paislee Pick Me up 6 x6 paper pad . The charms attached to the outside of the album are a mixture of pieces from Tim Holtz, Elle's Studio and Crate Paper.
 
 
I decorated the inside with Pick Me Up puffy stickers, Pick Me Up Rubons and Pinkfresh Studio The Mix puffy stars.   Some of the layers and details were fussy cut from papers included in the Pick Me Up Mini Swatch pads. I also snuck in a few stars from Freckled Fawn puffy stickers.


To create texture, I used border punches and machine stitched a lot of the pages and tags.
I also used some ribbon and brads from my stash. 
 The cut file is designed to fold up like an accordion which also means there are two sides to decorate and add photos!


I tucked in as many stickers and die cuts that would fit.  That is the beauty of working with a full collection because you know everything already matches!  I pulled pieces from the Pick Me Up Accent Stickers, Pick Me Up Journaling Spots, & Take Me Away Ephemera.

 
To mix up the design and matting of my photos, I stapled a few pictures together with my mini attacher.  They were pictures I wanted to use, but not ones with a big story behind them so I didn't mind having some hidden. 

 
One of the reasons I  love making mini albums so much is because it gives you the freedom to print and crop your photos in all different sizes.  I think it is so much fun and keeps it interesting from start to end!


I created a fold out mini in my mini...yeah, that's a little corny, but I used another little velcro circle to secure it and added one of the Pink Paislee Take Me Away paperclips
To finish up, I adhered some pretty Pretty Pink Posh 6mm clear sequins and Pretty Pink Posh 4mm clear sequins with glossy accents in my Precision Tip glue bottle.....boy, do I love that glue bottle!!
 
There are still so many details to mention, but if I did, this post might be the longest post ever!!  I did create a short flip through video on my YouTube channel though where you can see all of the tags and interactive elements as well!
click here.....  https://youtu.be/1sHTN9OEQX0
 
Thanks so much for taking a look! I hope you are inspired to create your own mini album...maybe for pictures you took at a family celebration, a day trip, or a show you saw!  If you do, I'd love to see! Please feel free to comments or questions below.
 
To pick up these products for yourself, head over to the Butterfly Reflections Ink online store.
Have a great week!  See you next week.
xoxo Heather


Sunday, August 12, 2018

"The heart of my home" Scrapbook layout //Butterfly Reflections Ink DT // Pink Paislee Auburn Lane

 
Hi, friends...I have another scrapbook layout with you for Butterfly Reflections Ink DT..
...and I realize its still Summer, but this time of year, I am counting the days until fall!  I love fall..it is my favorite season....therefore, I couldn't wait any longer to use the gorgeous Auburn Lane collection from Pink Paislee...This collection was released a couple of months ago and can be used for any occasion, but there are definitely fall accents and the colors are beautiful!  The picture is of my two daughters sitting at our dining table last year on Thanksgiving...My husband hosted dinner that year and I love presenting the food on a festive table!
 
The background is a Kaisercraft wood grain patterned paper from my stash and fits right in with the dusty fall colors of this collection.  I added a layer of clear gesso and then started on my mixed media background...now, anyone who likes to create mixed media backgrounds knows that in the end, most of it is covered by the photo and embellishments, but I like the way it peaks out from behind it all. 


I used several Distress Oxide inks with a paint brush to add color as well as splatters.  It was a little bit of a challenge to find inks that matched exactly, but Tattered Rose, Iced Spruce, Stormy Sky, and Evergreen Bough work well.  I actually mixed Evergreen Bough and Black Soot to create the dark teal color in the rub on sentiment to the bottom right of the photo. So don't be afraid to play with your inks to achieve the color you are after!
After the mixed media is dry, you can start adding embellishments and your photo.  I matted my photo on a couple of patterned papers from the 6 x 8 paper pad.
 

To create texture and interest to the background, I spread some embossing paste through the Echo Park Picnic Blanket Stencil..yes, the name of the stencil doesn't fit the theme of my page, but the pattern is gorgeous and not really theme specific.   Once that was dry, I stamped floral and leaf images from the Honey Bee Country Bloom stamp set with Archival black ink.  because the flower stamps remind me of the flowers in embellishments from this collection.  I use Archival black ink because it is waterproof and won't smudge. 


This collection also includes Puffy Stickers and Rub Ons and would have put all of them on my layout if I could! I used a couple of flowers, hearts, and tiny images from the rub ons and love the flat detail it adds.  I used a handful of the puffy stickers including the hearts, buttons, and a sentiment. Honestly, I have the hardest time with puffy stickers because I love them so much!  I want to use them, but don't want to because they will be gone....who knows that feeling?? I know, I know..crafty problems!


 The Auburn Lane Floral Emphemera pack of flowers are absolutely to die for!  There is a mix of cardstock die cut flowers, vellum with black flowers die cuts, and vellum with rose gold flowers die cuts as well as leaves in all different shades.  I created clusters of these flowers surrounding the photo and tucked in several leaves.  To make sure the flowers and leaves have some dimension, only add a little bit of liquid adhesive on the edge of the die cut.  To take it a step further, add a little piece of fun foam or pop dots to the edge so it doesn't flatten out when put into a page protector.
 
 
I created my title using one of the phrases from the Pebbles Heart of Home gold thickers and added the words "the" and"my" from the Pinkfresh Peach Alpha Puffy Stickers from my stash.  I felt as though adding those words made the title more personal to me.  I also added the year with those same peach alpha stickers to a sticker label underneath my photo.
To tie in to the sentiment of my title, I used the houses from the 6 x 12 Accent sticker sheet and popped up one with fun foam. 
To finish up, I added some splatters of Heidi Swapp Gold Color Shine and adhered some Pretty Pink Posh Rose Gold sequins with my Precision Tip applicator and Glossy accents
 
To watch my process, you can check out my video on YouTube linked below...
 
Thanks so much for taking the time to read about my project today and hope you are inspired to dive in to fall (even though its technically still Summer) and get crafty today!
To get these products in your hands, head over to the shop now before they are gone! 
Have a great week!
Wednesday, August 8, 2018

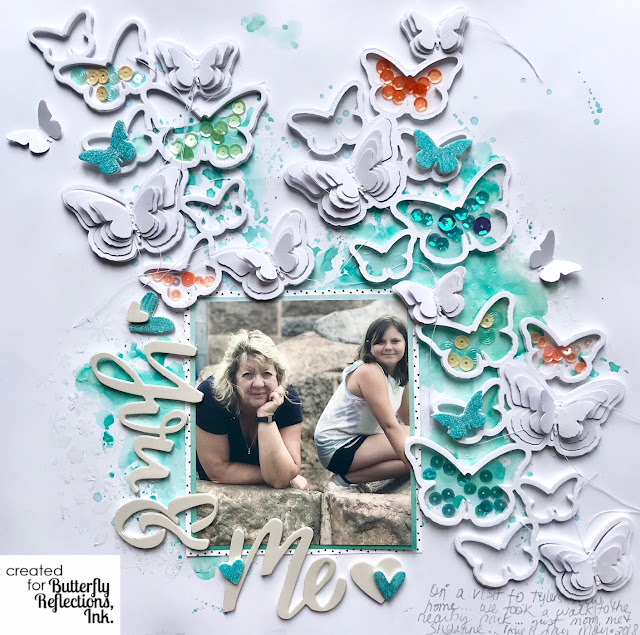
"You & Me" Scrapbook Layout ///Butterfly Reflections Ink DT

 
Hey crafty friends..I have a fun mixed media scrapbook layout to share!
The picture is of my mother and daughter on a beautiful day at the park and I managed to snap this gorgeous view of them.
 
This layout was inspired by this fantastic Spellbinders Cascading Butterfly die.  I LOVE butterflies and any product that allows me to use them and create different types of embellishments customized to match my project is a must have!!  This die is approximately 4" x 6" and it cuts the outline of the butterfly cluster as well as the butterflies.  I wanted to create lots of dimension and with this die and it is perfect to create little butterfly shaker pockets!
 
I started with a piece of white cardstock and spread a layer of clear gesso so I could add some Distress ink to my background.  Adding gesso allows the ink to spread easily without it soaking in to the cardstock too quickly as well as makes the background sturdy.  It will still warp some, but not as much.  I like to use clear gesso because white gesso does not ever match the white cardstock and the areas without the gesso will be very visible. 
I used Distress Oxide Peacock Feathers and Distress Oxide Broken China on my background by smooshing it with some plastic packaging....there really is no rhyme or reason to how I applied it, just random, but I always love the end result!
 

After the distress ink was dry, I used the Echo Park Easter Hunt Stencil with Dreamweavers Translucent Embossing Paste to create subtle texture.  I like this translucent paste because it dries almost clear, but with a sheen to it so it doesn't disappear.   It will still be highlighted over where the ink was applied.


For the butterfly clusters, I cut it several times in white cardstock, fun foam, and clear acetate.  I love the dimension the fun foam provides....you can cut most types of fun foam with  your manual die cutting machine and dies to get your own foam thicker embellishments!  I layered the cascading butterflies with fun foam using Stick It double sided adhesive sheets and two of them with clear acetate sheets.  At this point, I wasn't sure how I wanted all of the butterflies to have an acetate top to it but it was much easier to just cut the entire shape in acetate then one butterfly at a time! 
Keep in mind, with such a large die and working with fun foam, you don't want to use quick drying liquid adhesive because you won't have a lot of wiggle room to get the layers straight!  Use double sided adhesive sheets or glossy accents works too.
 

Once I had the butterfly clusters where I wanted them I started planning which sequins to use and which butterflies to put them.  I didn't want all of the butterflies to be filled in, but randomly selected a few.  I filled those spaces with Pretty Pink Posh Fresh Mint Sequin mix Neat & Tangled Sunset Shimmer Sequin Mix, and others from my stash.  I adhered them with my precision top glue bottle.  I love this bottle!!


Since I was left with so many butterflies, layered them and stitched down the center with my sewing machine.  I love the look of the dangling threads because it creates a little messy texture.  I also used some of the foam butterflies to layer underneath the butterfly stacks.  For sparkle and shine, I used the Tonic Aqua Shimmer Pen on some of the butterflies and then I got a little crazy with the shimmer....

 
There were so many foam butterflies left over, I pull out my Tonic Athenian Blue Glitter Marker and they turned out beautiful!  They were my own homemade foam thicker embellishments! 
 
 
For my title, I pulled word stickers from Pink Paislee Dream Thickers along with a couple of the matching hearts.  I also had some foam hearts from a previous project that I colored with the Tonic Glitter marker.  I love creating my own embellishments because they can be customized to fit any color scheme or theme!
 
Thanks so much for stopping by!  I hope you are inspired to create your own embellishments with fun foam, dies, and lots of shimmer!  You can find these products as well as so many other dies you can use to create custom embellishments at Butterfly Reflections Ink online store.
 
If you'd like to see my whole process, you can check out my video on YouTube linked below....
 
Id' love to know what you think!  Please feel free to leave any comments or questions you may have below!  Thanks so much! Have a great week!
December Kit share - My Creative Scrapbook Kit Club/main Kit

Hey my friends....Happy new year!! I realize this post is a little late, but I have been spending time with my family and working on new co...