
Hey crafty friends...Its been a minute since I've posted, but I have (4) layouts for you today created with the December main kit from My Creative Scrapbook kit club!
This is my second month as a guest designer and its been so much fun receiving current products right at my front door as well as some fun coordinating products!
The current December main kit includes products from Simple Stories, Echo Park, as well as some ribbon which is always fun to add for texture!
If you aren't familiar with MCS, check out their website for the current kits...they offer several different kits packed with different collections and project ideas! Each month the design team creates dozens of projects with these kits prior to the kits being shipped to all subscribers...this way, when you receive your kit, you have inspiration that same day! There is also a sketch shared each month you can use to start with and the are several super cute digital cut files available for free!
These cut files can be downloaded from their website in the "add-on" tab for free whether you are a kit subscriber or not!
**********************************************
My first layout below.... "Noel" includes exclusive cut files from My Creative Scrapbook.
The original cut file is a large circle with poinsettia at the top with leaves and I cut additional poinsettias and leaves to embellish with.
I decided that the original cut file in the center was just to predictable...and decided to cut it and add as it both sides were coming off the page. I love the way it turned out and finished it off with a couple of brads from Echo Park and some of the ribbon.
The last few details I added were matching Simple Stories stickers and chipboard from Echo Park. I used red brads on the stickers on the right side and finished up with chipboard stars and hearts.
All included in the kit.
Lastly, I pulled out my red nuvo drops to add to the "berries" on my cut file and my Nuvo Shimmer pen to add shimmer to all of the die cuts. I also used white nuvo drops to add some detail on the background paper.

***********************************************************************
My 2nd layout is a design I have created before, but one of my favorite go to's with collections that have beautiful patterned papers. It is a simple process, but the end result is always beautiful and reminds me of a quilt! I cut 2" squares and cut in half to make triangles and just started laying them down on my background paper. I picked a pattern paper with no color so it wouldn't end up looking too busy and competing with the patterns below.
The only challenge is to be sure that the patterns and colors are spread somewhat across the page.
I matted my photo and adhered on fun foam following the same angle as my "quilt" and then added my title from the chipboard words from American Crafts included in the kit.
I pulled a few die cuts and chipboard pieces to embellish around my photo and added some splatters with my Shimmerz paints for a little more color on the top portion. Lastly, I thought the layout needed a little cluster on the bottom right to balance it overall and just added a few more die cuts and chipboard pieces and kept it small since there is already so much color and pattern.
I do have a Youtube process video for this layout which you can watch here....

**************************************************************
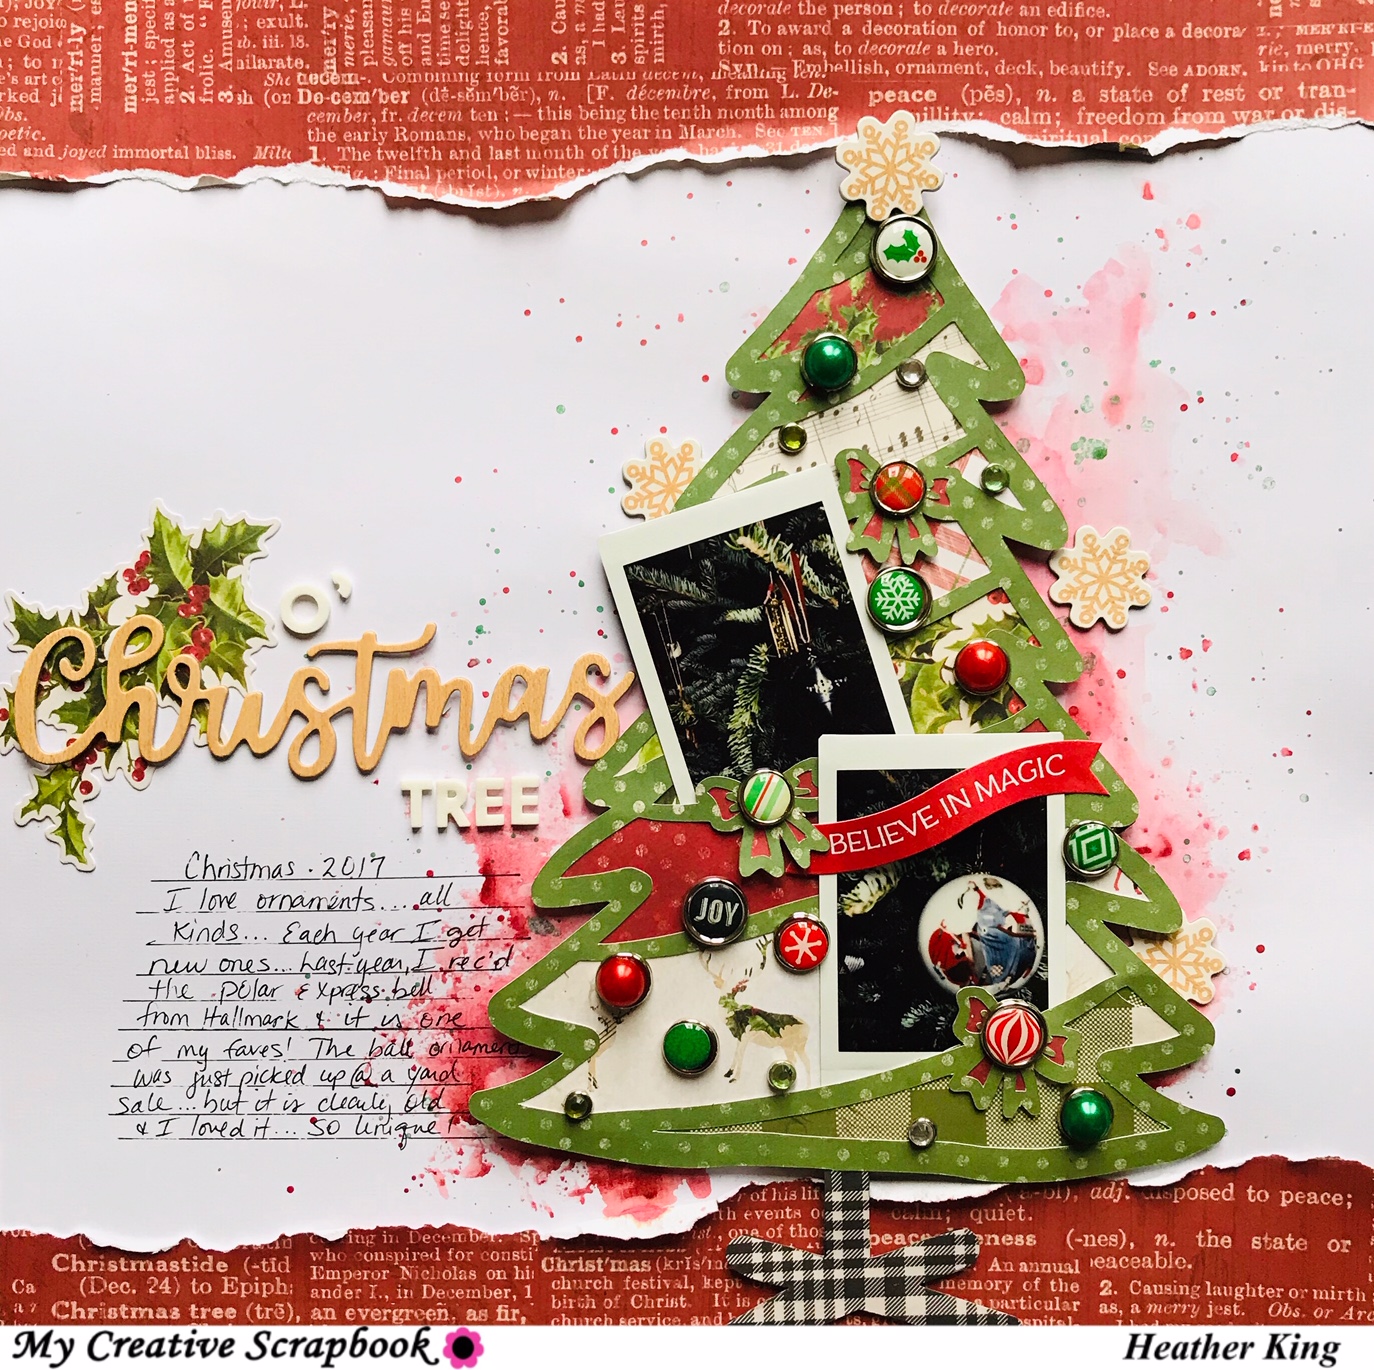
My 3rd layout was so much fun to create and may have been partially due to the story behind it...My husband gave me a polaroid camera for last year which was so exciting so I was taking pictures of all sorts of things with it...a couple of those pictures were of my new ornaments. Each year, I receive new ornaments from my mother or I've purchased myself, but I cherish my ornament collection so it was appropriate to document!
Before adding the "Christmas tree", I added a layer of clear gesso to my white cardstock and smooshed some watercolors from my stash for some color peeking from behind the tree. I used paints from Shimmerz, Hero Arts, and Kuratake Gansai.
Since one of this months exclusive cut files was a tree, I thought it would be fun to tuck in my ornament pictures. I backed the open areas with patterned paper and then adhered most all of the Echo Park brads included in the kit. I don't use brads often anymore (which I am sure is the case for most of us ...?)
but the idea of using the brads as other "ornaments" was very exciting!
To balance all of the open space in the background, I tore some of the red patterned paper and distressed it some to add to the top and bottom of the page. Of course, since there was a long sentimental story to this layout, I had a lot to say in my journaling and the title says it all, right?
I used a large chipboard word from the kit and the white thickers are from Paige Evans from my stash. I love how it turmed out!!
****************************************************************
My 4th layout was my most time consuming layout of the four, but my favorite! It is of my daughters holding their new ornaments of the year which is kind of an extension of the story from my 3rd layout...can you tell our ornaments are huge in my family??
That being said, I had a lot of journaling for this one as well, but since the layout was about ornaments, I thought I would break out my paper punches (yep, I said punches!!) to create little embellishments "ornaments" to "hang" on my page....I used the red and green ribbons included in the kit to make bows for each ornament and really thought the hand stitching made it complete! I used coordinating colors of embroidery floss and the chain link stitch to create all of this beautiful texture....My inspiration behind the stitching is definitely, Paige Evans...I have been sewing for years, but after watching video after video of Paige Evans hand stitching on her layouts, I thought, I can do this! I learned this type of stitch from her as well and she has several videos on her YouTube channel explaining the process. Once you've done it a couple of times, it is easy ad anyone can do it...and floss is cheap and lasts a while, so if you haven't tried it...go ahead and experiment.
You can start small with simple shapes like this one and I am sure you will be hooked!
Each ornament has a combination of die cuts and chipboard embellishments which some I've popped up on adhesive foam and most all, I used my Nuvo shimmer pen to add some sparkle..because everything looks better with sparkle!
Lastly, I wanted to added a little bit of "shine" coming from each ornament which I added with watercolors from my stash....I think the background was too white for my taste anyway!
My title came from the echo park chipboard in the kit and I added some white thickers from Paige Evans from my stash.
I do have a YouTube process video for this layout if you'd like to watch...click below...

Thanks for sticking with me till the end...I hope enjoyed looking through my projects for this months kit from My Creative Scrapbook. Maybe you found some inspiration of your own....?
You can also find more ideas and inspiration from the other designers in the gallery on the website and you can see the complete details of each kit's contents as well.
Please free to leave me any comments or questions and then head over to My Creative Scrapbook Kit Club to sign up for next months kits!!
Happy Holidays and have a great crafty week!
hugs, Heather


No comments:
Post a Comment