Saturday, June 15, 2019

"Lovely" 12x12 Scrapbook layout // Cocoa Vanilla Studio Happiness Collection

Hey friends...I am guest designing over at Butterfly Reflections Ink this month and I am back sharing a layout created with one of my favorite collection lately....Cocoa Vanilla Studios "Happiness Collection
I love this collection...its bright rainbow colors, gorgeous clear stickers, and the oh so pretty embellishments!
 
I started with a white piece of white cardstock as my background and cut a bunch of "spring florals" on my silhouette from Just Nick Studio also from white cardstock.


I backed the flower die cuts with patterned papers from the 6x8 paper pad.  Then, for a little sparkle and shine, I embossed the tips of the flowers with WOW sparkle silver embossing powder using Versamark embossing ink.
 
 
I adhered the flowers vertically just in the centers to keep the petals lifted and popped a few of them up with pop dots.  After matting my photo with a couple of patterned papers, I added stickers from the cardstock stickers and the clear stickers around my photo and layered underneath my large flowers.  I love the clear stickers in this collection...they mimic watercolor patches without breaking out the water!  

 
To embellish the layout, I added some matching butterflies and my title die cut from the ephemera package.  To finish up, I added Nuvo drops and Pretty Pink Posh sequins to the center of a couple of large flowers.

 
 I hope you enjoyed taking a look at my layout!  Thanks for stopping by!  I'd love to know what you think.  Please feel free to leave a comment or questions below. Then, head over to the shop to get your hands on this collection before its gone!
Enjoy your weekend!

Tuesday, June 4, 2019

My Creative Scrapbook Kit Club // May Main Kit scrapbook layouts

 
Hey crafty peeps....I know this post is a little late as we are now in June, but I had some awesome inspiration I wanted to share so here it is....
 
The May Main kit from My Creative Scrapbook Kit Club was packed with Pink Paislee/Paige Evans Horizon collection paired with some fun embellishments!
I do have an unboxing video on my youtube channel if you are interested to see what  I started with.
 
 
I created four layouts starting with the one below using one of the exclusive cut files offered from MCS for free.  I thought it would be fun to back with the rainbow patterned paper from the kit and add some hand stitching with rainbow threads.  It was quite time consuming, but so worth it!  The results are gorgeous!  This is such an easy way to add detail and texture without any skill!
I finished the layout with some splatters, a few matching embellies and a title from the Vicki Boutin sticker alphas from the kit.
 
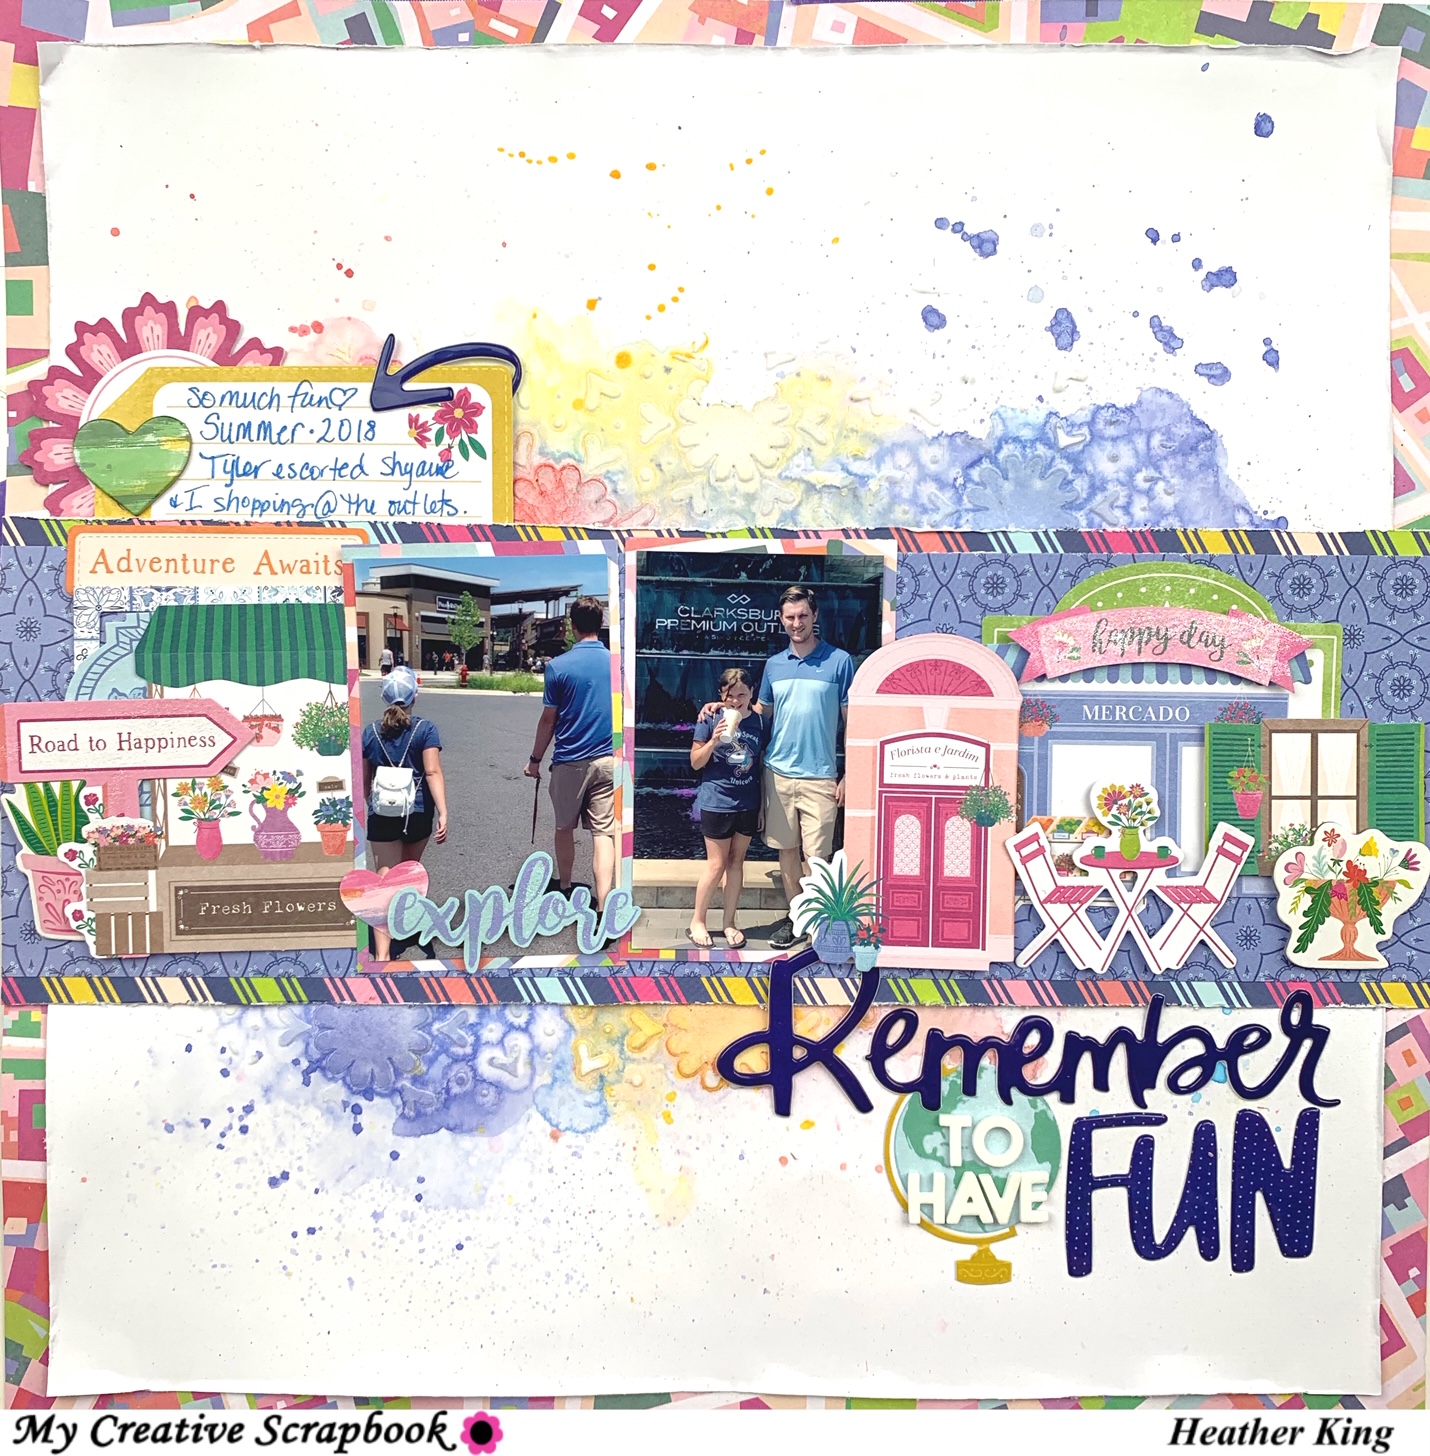
My second layout was all about those cute little die cuts that look like little store fronts which were perfect for my shopping trip with my daughter and little brother!
I also used an exclusive cut file, but to use as a stencil with texture paste and lots of mixed media!
After the background was dry, it was just a matter of layering those fun die cuts.


My third layout was so much fun to make!  I used lots of exclusive cut files and layered with patterned papers and vellum.  There was a lot going on in this layout, therefore, once I added a few die cut flowers, my title, and a little mixed media on the background, it was good to go!  I love how bright and cheerful it is.


And last, but not least, my fourth layout.  I used all of the chipboard pieces included in the kit and painted them to match this collection.  I knew I wanted to add lots of little "frames" to have embellishments sit in and decided after much debating, to have them cascading down the page from my photo at the top.  You can watch how this layout twisted and turned on my YouTube channel.


Thanks so much for stopping by and I hope you enjoyed these layouts created with the May Main kit!
I'd love to know what you think! Please feel free to leave any comments or questions below!
 For more information on the available kits, head over to My Creative Scrapbook Kit Club to learn how you can have new, beautiful products delivered to your door each month!

Thursday, May 16, 2019

Craft Room Tour :pictures & video ///updated 2019

 
Hey friends!!  I have to apologize for being mia for a bit!  I have been creating, but just have slacked a little on keeping up on my blog posts!  so, I am sorry, but I have some fun stuff to share with you the next couple of weeks so stay tuned....and this post, is all about my updated craft room! 
 
I am so excited with my space and finally feel like it is the perfect space for me to be creative and productive!  The first and last craft room share was in early 2018 at the beginning of my new social media journey and while it was a really nice space, I knew there was room for improvement!  I am beyond grateful to have my own room to craft in after the years and years of crafting at my dining room table and it has even take 6 years of living in our current home to get this room just as I like it...or love it! :)
 
 
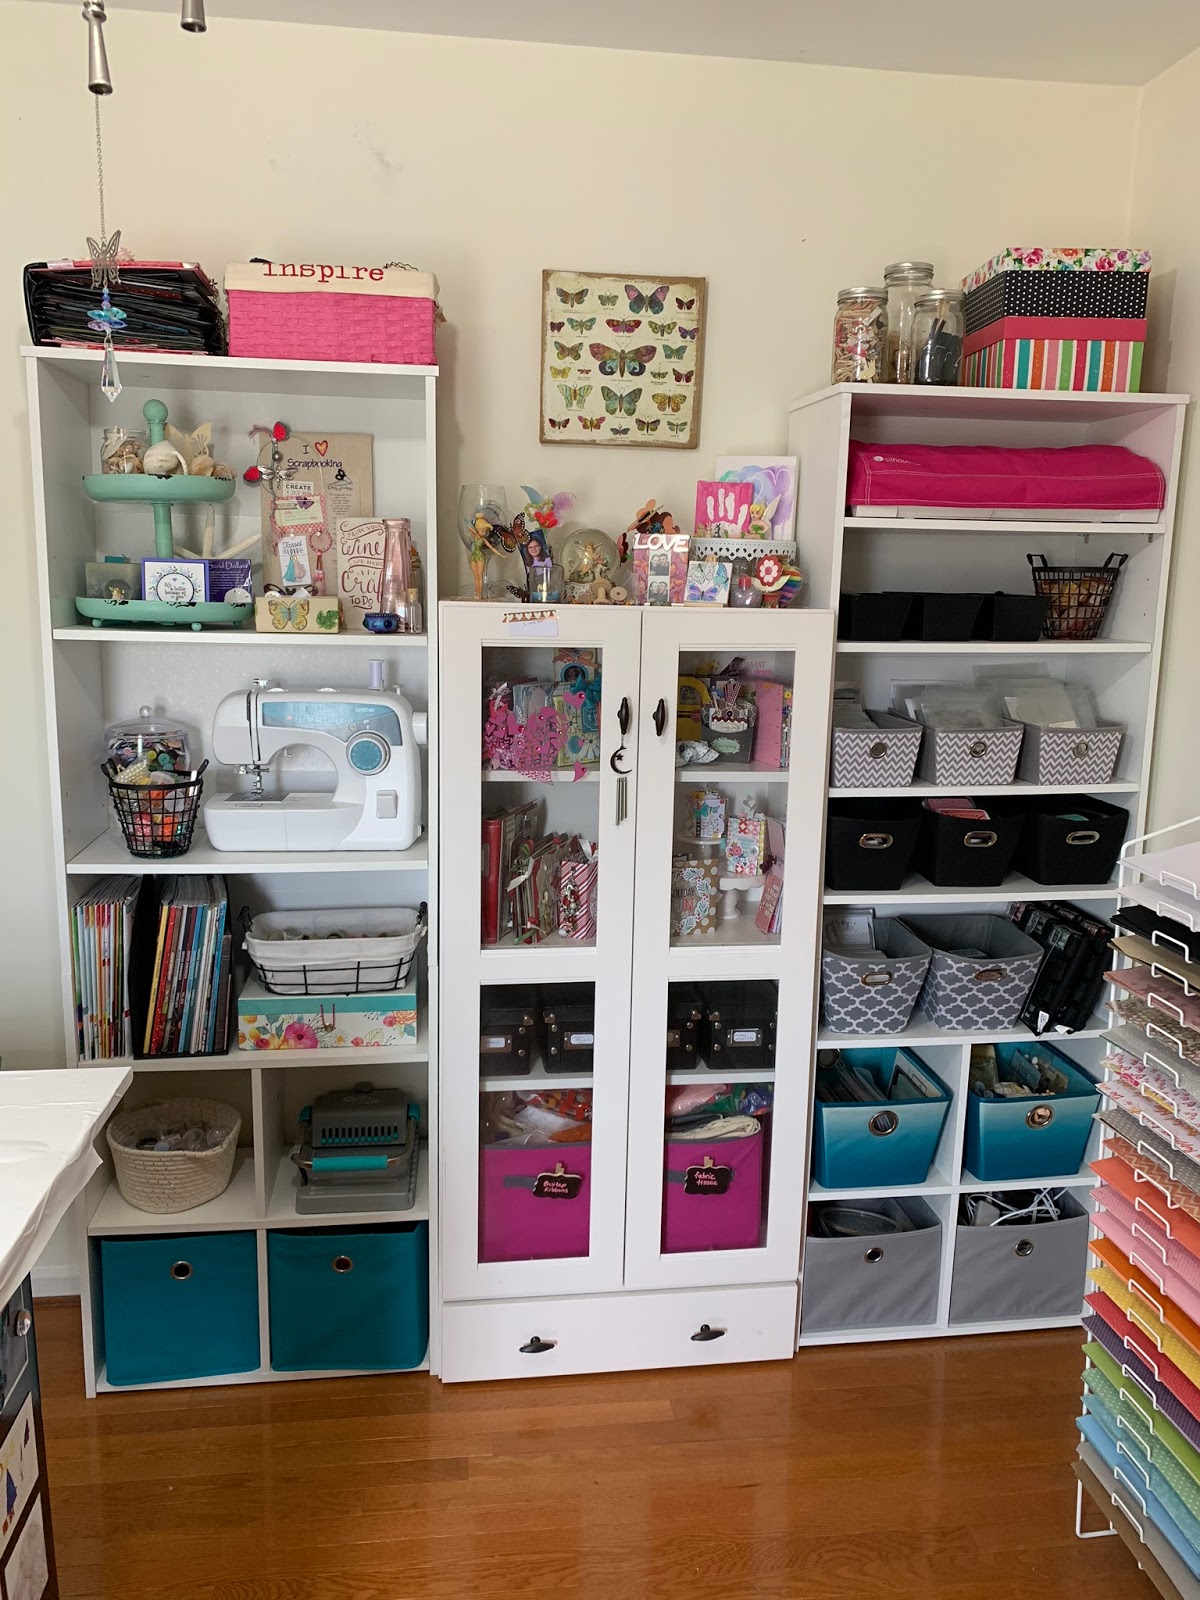
This is the view from my door and it makes me smile every time I walk in!
I have a mix of yard sale and throwaway pieces....I am a kitchen designer and every once in awhile, a cabinet or accessory arrives damaged and they are replaced immediately, however, instead of throwing them away, I incorporated them into my craft room.   Kitchen cabinet organization is also perfect for craft room storage!!
 
This fun tassel banner is from an etsy shop called "Tassel Love".  This shop has tassels in all different colors and lengths and they are gorgeous!


This cart is from Michaels and holds all of the tools and essentials I use on a daily basis.  I love that it is on wheels and I can move it when I need to access my closet.  My closet has materials and projects I don't use often.  
 
 
This wall is very precious to me!  I was lucky to have my first layout published in Creative Scrapbooker Magazine in the fall of 2018 and then three more in their winter issue.  In 2019 I have had two more published and one expected to go to print in a couple of months so my frames are already almost filled up!  I am so thrilled to have my work printed to share and love seeing them on my wall next to my work space. 

This wall is on the left when you walk in and the units on the ends are just bookshelves you put together at home so they aren't the sturdiness, but they work for me and hold a ton of my stuff!  I love using matching bins to organize my materials and tools.  For instance, my stamps, dies, sequins, flowers, and list goes on!


This section of my wall has cabinet drawer organizers that I backed with patterned paper and then used them to store all my glitters and nuvo drops.  My husband also installed a small shelf underneath so I could set my little embellishment jars on it.  I like the look of the jars and being able to see everything.
 
You can see a lot more in my video share on my youtube channel, but somehow I missed opening this one drawer! hahaha....this is where I store all of my embossing powders, perfect pearls powders, embroidery floss and a few other items.

 
I really hope you liked the tour through my happy craft space and make sure you check out my youtube video tour for more details!
 
Have a great day!!

Thursday, March 21, 2019

"Road Trip-Vermont" mini album//My Creative Scrapbook Kit Club March main kit

Hello again, crafty peeps! As promised, I have a bonus post featuring the mini album documenting my mini road trip to Vermont with family using the March main kit from My Creative Scrapbook Kit Club. It is filled with the new Pebbles Chasing Adventures collection.
I loved creating this mini album and it was so easy to do!  mini albums don't always have to be about big adventures or have fancy albums or binding. 
Mine has beautiful patterned papers with a binder ring and cute handmade paper bead charm and I am super happy with the way it turned out!
 
I started with this months exclusive cut files available for free on the website under the "Add on kits" tab. Scroll to the bottom of the page and you will have access to all of the current and past cut files.  These cut files are available to everyone whether you are a subscriber or not, but you will find that these cut files are designed with the kit in mind and will be gorgeous if paired with the kit.
I used the flower tags and frames as some of my pages and filled in the album with other fun patterned papers and cards from the cut apart paper.
The cover cut file is actually backed with a post card I got while in Vermont and finished it with some beautiful florals and that was it. Picking up memorabilia from your adventures make for fabulous additions to your mini album!
 
 
I traced the shape of the cut file tag on patterned papers to create other mini album pages.  Added my photo and embellishments...and voila!  with a collection like this, it makes it soo easy!


The 3x4 card below was part of one of the patterned papers and I hand stitched the sentiment and rounded the corners.  I thought it was appropriate sentiment and icon for this trip!


The next page I cut  by hand and added a couple of photos with a brad.


This is another page I created using a cut file and one of my fave pics! My daughter loves unpacking her things in a hotel...I have seen her move her things around to several drawers to determine the best fit...so cute to watch and definitely something to document!  The little bags and luggage is so perfect!


Another page I cut by hand and once I added my photo and beautiful embellishments plus a couple of small flower cut files, it fits right in with the cut file pages.


I also cut a cut file frame in patterned paper to layer over a cute photo of my mom and daughter.  To finish, I added a sentiment from the foam thickers in the kit and floral stickers.


My last page/back cover is another post card I picked up and with the lovely landscape in the background , it was the perfect spot for the foam sentiment and the last couple of cut file flowers. 


Lastly, I have been so inspired by Lisa Fonseca and her paper beads, I thought it was time to try for myself.  They are so simple to make and you can watch how in one of her many YouTube videos. 
I added some beads and fringe charm and added to my binder ring. 


This was so much fun to make and the inspiration hit me as soon as I received my March main kit!  You never know what kind of inspiration might spark your creativity so make sure you head over to My Creative Scrapbook and sign up for your kits delivered right to your door!!
Thanks so much for reading on and if you'd like to watch a full flip through, click on the link below...
Thanks again and have a great week!!


My Creative Scrapbook Kit Club// March Main Kit scrapbook layouts


Hi, crafty friends....I have new layouts to share using the My Creative Scrapbook Kit Club March Main kit. 
This kit is packed with the new Pebbles "Chasing Adventures" collection and has a lot of travel them icons and patterned papers which makes it a fun collection to use for any adventures you or your family have documented.
 
 
My first layout is based on the monthly sketch created by Laura Whitaker..pictured below....
My design came together fairly quickly when using inspiration such as this.  I used die cuts and foam stickers from the kit to embellish and I am happy with the way it turned out.
Sometimes, you just want to create and not spend too much time debating the design and using a sketch is such a great creative starter!

 
My second layout was actually the fourth layout I created using the kit and I had an idea of the overall design of the layout because at this point, I had lots of the fun little embellishments left.  I was struggling though with how to balance the layout because my photo was portrait orientation and it left the right amount of space for those embellishments, but I couldn't decide how to add my journaling!  I am not a huge story teller when it comes to my layouts, but there are some pictures that I feel definitely require more than a sentence or two to explain the event.  Since my background already had text, I couldn't place it there and I thought about adding around the border, but I thought that would be too busy and hard to see.  So, for the first time ever, yes, ever, I added my journaling on little cardstock strips and laid over top my photo.  This photo was perfect for it because all of the dark space at the bottom...I can't believe I haven't ever done this before.  I have seen it on other layouts, but never felt like it worked for me, until NOW! :) and I am super happy with the result.


My third layout, or should I say layouts :)did take the longest to finish and for good reason!  Its a double page layout!  and the first double layout I've created in years...I don't know why and think I should try to do this more often.  I had several pictures from my parents travels (that I stole from their Facebook account, hehe ) and knew I wanted to document them, but hadn't come up with an idea until I saw the cute cut files created by Ashley Horton from The Cut Shoppe.  She created a couple of cut files just for My Creative Scrapbook Kit Club based on this months kit.  You can find this cut file and others on the website and they are free for all of you to use!
Below are a couple of close ups, but I did record my whole process for my YouTube channel...you can watch how I incorporated modeling paste, this months stencil and a little mixed media in this double page layout at the link below...


Thanks so much for reading on and I hope you found some inspiration for your next travel layouts!
I created one more very special project using this kit, but thought it was worthy of a separate post to come shortly....head over to My Creative Scrapbook Kit Club to sign up for kits delivered to your door!
Please feel free to leave any comments or questions below!
Have a great day!!
 

Thursday, February 21, 2019

My Creative Scrapbook Kit// February Main Kit scrapbook layouts

 
Hi crafty friends....I hope your February has been love & fun-filled!!
I have (4) scrapbook layouts to share with you using the February Main Kit from My Creative Scrapbook....it is filled with Paige Evans Whimsical collection and I love it!!
 
You can find the kit and more information here..and if you hurry, you might be able to still order one if not sold out!
This kit includes Whimsical (12) double sided patterned papers, Whimsical flower die cuts, Whimsical chipboard stickers, American Crafts white phrase stickers, American Craft gold foam thickers, & Heidi Swapp stencil. 
 
 
The first layout was inspired by the purple in my daughters shirt....My design idea started with just keeping mainly to pinks and purples in the collection, but I couldn't hold back with all of the gorgeous flowers!!  I broke out my border punches too!! I used them on the branding strips to create a grid style background.. to create flower clusters in the top left and bottom right.
The bottom left area was perfect for my title and journaling.  The top right section I added a few additional embellishments and some inked hearts through the stencil.
Underneath it all, I used my distress oxides to create a mixed media background to coordinate with all of the embellishments.
 
The second layout came together fairly quickly with the exclusive cut file for this month...
I cut it with one of the patterned papers and used as a frame for my photo.
The other circle was perfect for my journaling.
I used the beautiful Shimmerz paints to create my background and finished the layout with more beautiful flowers~
 
 
My third layout was the simplest, but definitely, the most tie consuming...I knew I wanted to create shaker pockets with the cloud cut file offered this month because it was perfect to go with my daughters "magical" picture...but I did not want to add all of the adhesive foam to make it happen...check out my process video linked below to see how I did it!

 
The last layout is definitely my favorite...I didn't use any cut files, just plain old basics...cutting paper with scissors!  I love the way this turned out and the story behind it has a special place in my heart.....To hear all about it, you can watch my process video linked below...


Thanks so much for stopping by.  Please let me know if you have any questions or comments, I'd love to hear!  Make sure you head over to My Creative Scrapbook now to reserve your next kit!
Have a great weekend!


Tuesday, January 8, 2019

My Creative Scrapbook Kit Club//Scrapbook layouts//January Main Kit

Hey all...I hope you had a nice holiday season!  Welcome 2019!
I am looking forward to great things in the new year and hope you are as well!
One little tid bit of good news to share is that I have been asked to join the My Creative Scrapbook design team for the year of 2019!  Yay....which means, I will be sharing layouts each month using the main kit.
 
This month, in the January main kit, feature papers and embellishments from the "freezing season" collection from Simple Stories.
It also includes a stamp set, American Crafts pink word thickers, white burlap ribbon, and silver beaded trim.


***************************************************
 
 This is the first layout I created with the kit.  I fell in love with all of the cute chipboard and die cut embellishments in this collection and I really liked the idea of creating a collage of those embellishments.
I started with layering the patterned papers diagonally keeping the center portion as a less busy background to avoid the embellishments making it too busy.
I did add a layer of clear gesso on the center portion and shimmerz paints to peak behind the pieces.
I machine stitched along the striped papers which were the perfect location for my title. 
My title consists of chipboard pieces and rose gold thickers from Paige Evans.


Then, I began placing the embellishments around my photo like a puzzle.  Some were popped up on foam tape and some were finished with Nuvo crystal glaze.  This adds some shine to otherwise flat die cuts.
This is a simple design that works with any collection and anyone can accomplish!
 
 
******************************************** 
 
The 2nd layout I created is also pretty simple and based on the monthly sketch. 
Its quite the same as the sketch, but the purpose of the sketch is to inspire you so however, the finished layout turns out.  
 
 
My interpretation is a loose one, but I am happy with the way it turned out.  I used a couple of the cards on the cut apart paper to balance my photo and to balance the layout, I layered strips of the patterned papers on the top and bottom of the page.  I also tucked in pieces of the burlap ribbon in those layers. 
 
 
To watch my whole process, keep a look out for the video on my YouTube channel coming up in a couple of weeks!


***************************************
 
 
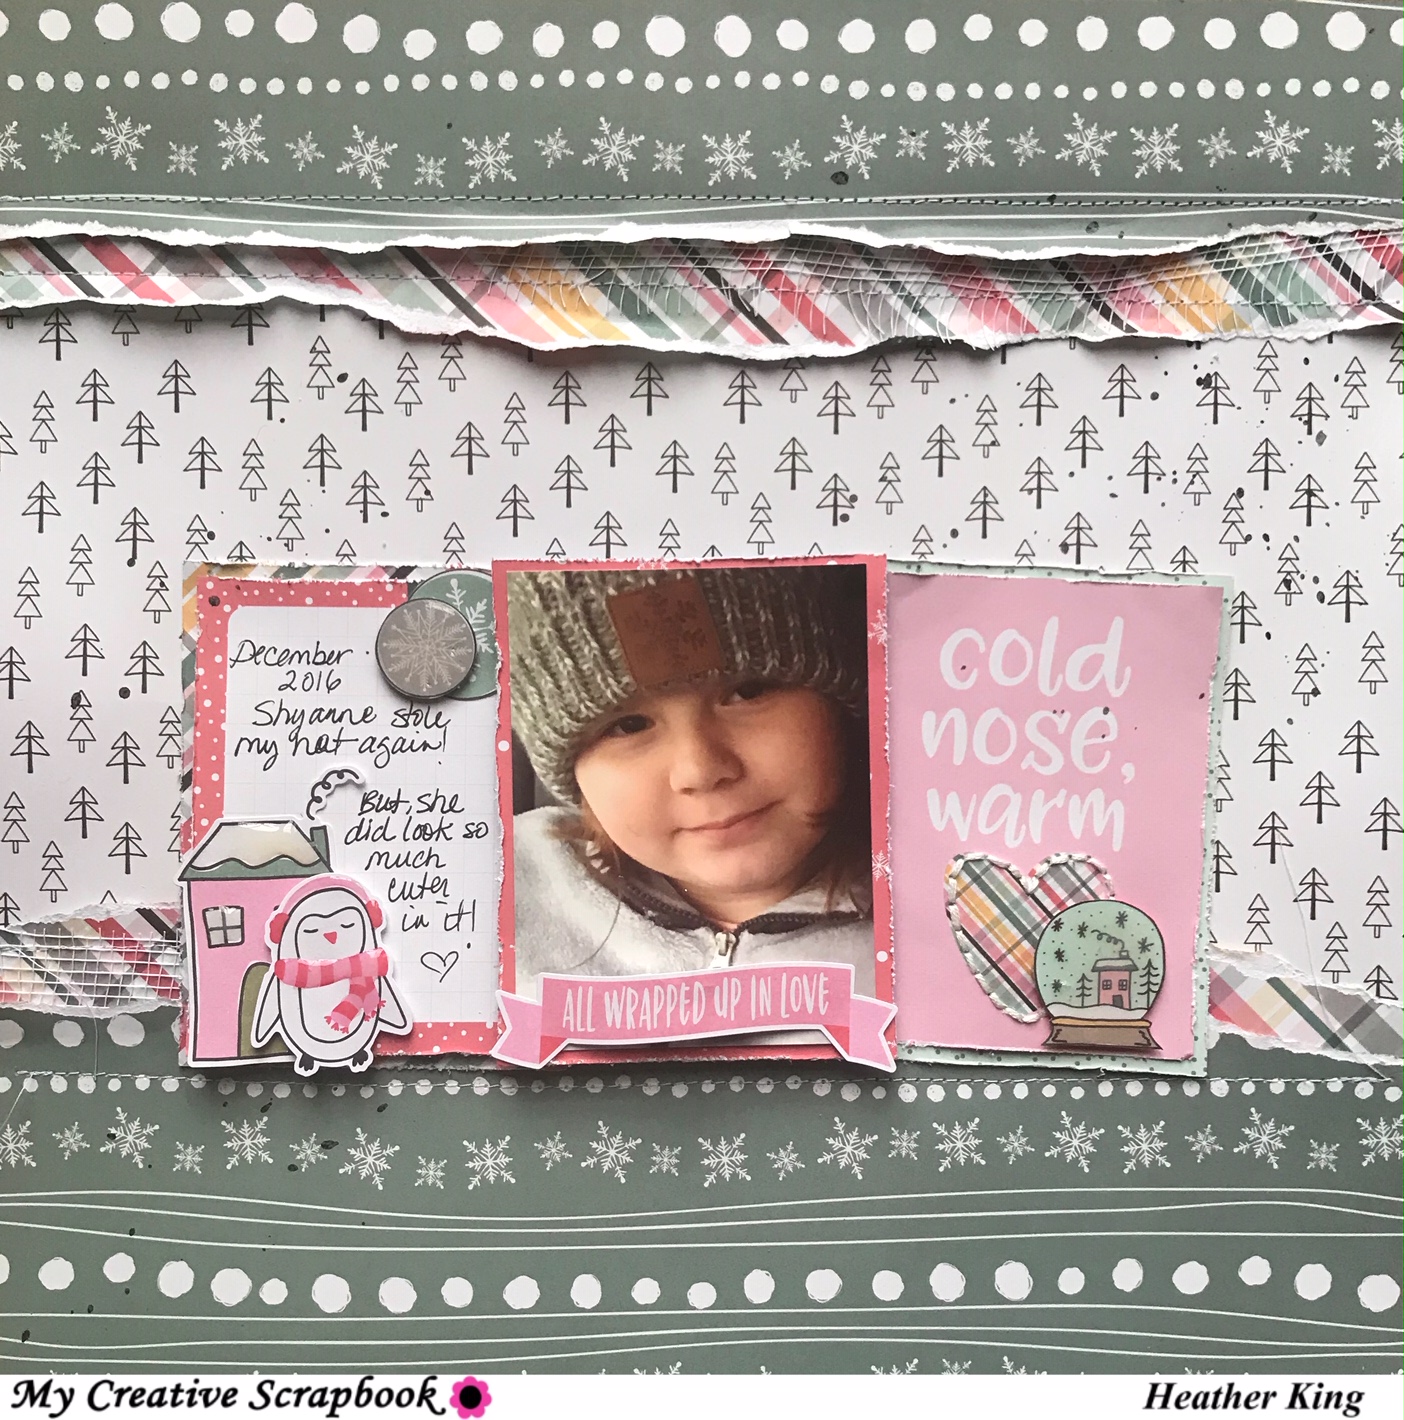
My third layout is a fun monochromatic mixed media page.  I started with the cute penguin page and fussy cut around them about half way up.  I have seen this same look on other layouts recently and thought it was fun.  On the background, I spread a layer of texture paste through a snowflake stencil from Echo Park.  Once dry, I painted on matching Shimmerz paints for a little bit of color, then added a few snowflakes I cut in vellum and white cardstock using a Simon Says Stamp die.
Next, I pulled all of the mint/green/blue embellishments to layer in clusters on either side of my photo. 
This layout was time consuming because of the mixed media, but a simple design and I loved the way it turned out!


*********************************
 
On my 4th layout, I used one of the exclusive cut files offered by My Creative Scrapbook and cut from white cardstock.
I popped up the entire cut file up for dimension and then layered chipboard and die cut pieces in the center of the snowflakes. 


To watch my whole process, check out my YouTube video...you may see a few unexpected details.


Thanks so much for stopping by to check out these projects using the January Main Kit from My Creative Scrapbook Kit Club.
If you like these pages, you will definitely be interested in this kit!
Head over to the website to check out this kit and the others.
Have a great week!


Saturday, December 22, 2018

My Creative Scrapbook Kit Club - December Main kit layouts

Hey crafty friends...Its been a minute since I've posted, but I have (4) layouts for you today created with the December main kit from My Creative Scrapbook kit club!
 
This is my second month as a guest designer and its been so much fun receiving current products right at my front door as well as some fun coordinating products!
The current December main kit includes products from Simple Stories, Echo Park, as well as some ribbon which is always fun to add for texture!
 
If you aren't familiar with MCS, check out their website for the current kits...they offer several different kits packed with different collections and project ideas! Each month the design team creates dozens of projects with these kits prior to the kits being shipped to all subscribers...this way, when you receive your kit, you have inspiration that same day!  There is also a sketch shared each month you can use to start with and the are several super cute digital cut files available for free!
These cut files can be downloaded from their website in the "add-on" tab for free whether you are a kit subscriber or not!
 
**********************************************
 
My first layout below.... "Noel" includes exclusive cut files from My Creative Scrapbook.
The original cut file is a large circle with poinsettia at the top with leaves and I cut additional poinsettias and leaves to embellish with.
I decided that the original cut file in the center was just to predictable...and decided to cut it and add as it both sides were coming off the page.  I love the way it turned out and finished it off with a couple of brads from Echo Park and some of the ribbon. 
The last few details I added were matching Simple Stories stickers and chipboard from Echo Park.  I used red brads on the stickers on the right side and finished up with chipboard stars and hearts. 
All included in the kit. 
Lastly, I pulled out my red nuvo drops to add to the "berries" on my cut file and my Nuvo Shimmer pen to add shimmer to all of the die cuts. I also used white nuvo drops to add some detail on the background paper.


***********************************************************************

My 2nd layout is a design I have created before, but one of my favorite go to's with collections that have beautiful patterned papers. It is a simple process, but the end result is always beautiful and reminds me of a quilt!  I cut 2" squares and cut in half to make triangles and just started laying them down on my background paper.  I picked a pattern paper with no color so it wouldn't end up looking too busy and competing with the patterns below. 
The only challenge is to be sure that the patterns and colors are spread somewhat across the page.
I matted my photo and adhered on fun foam following the same angle as my "quilt" and then added my title from the chipboard words from American Crafts included in the kit. 
 I pulled a few die cuts and chipboard pieces to embellish around my photo and added some splatters with my Shimmerz paints for a little more color on the top portion. Lastly, I thought the layout needed a little cluster on the bottom right to balance it overall and just added a few more die cuts and chipboard pieces and kept it small since there is already so much color and pattern.
 
I do have a Youtube process video for this layout which you can watch here....


**************************************************************
 
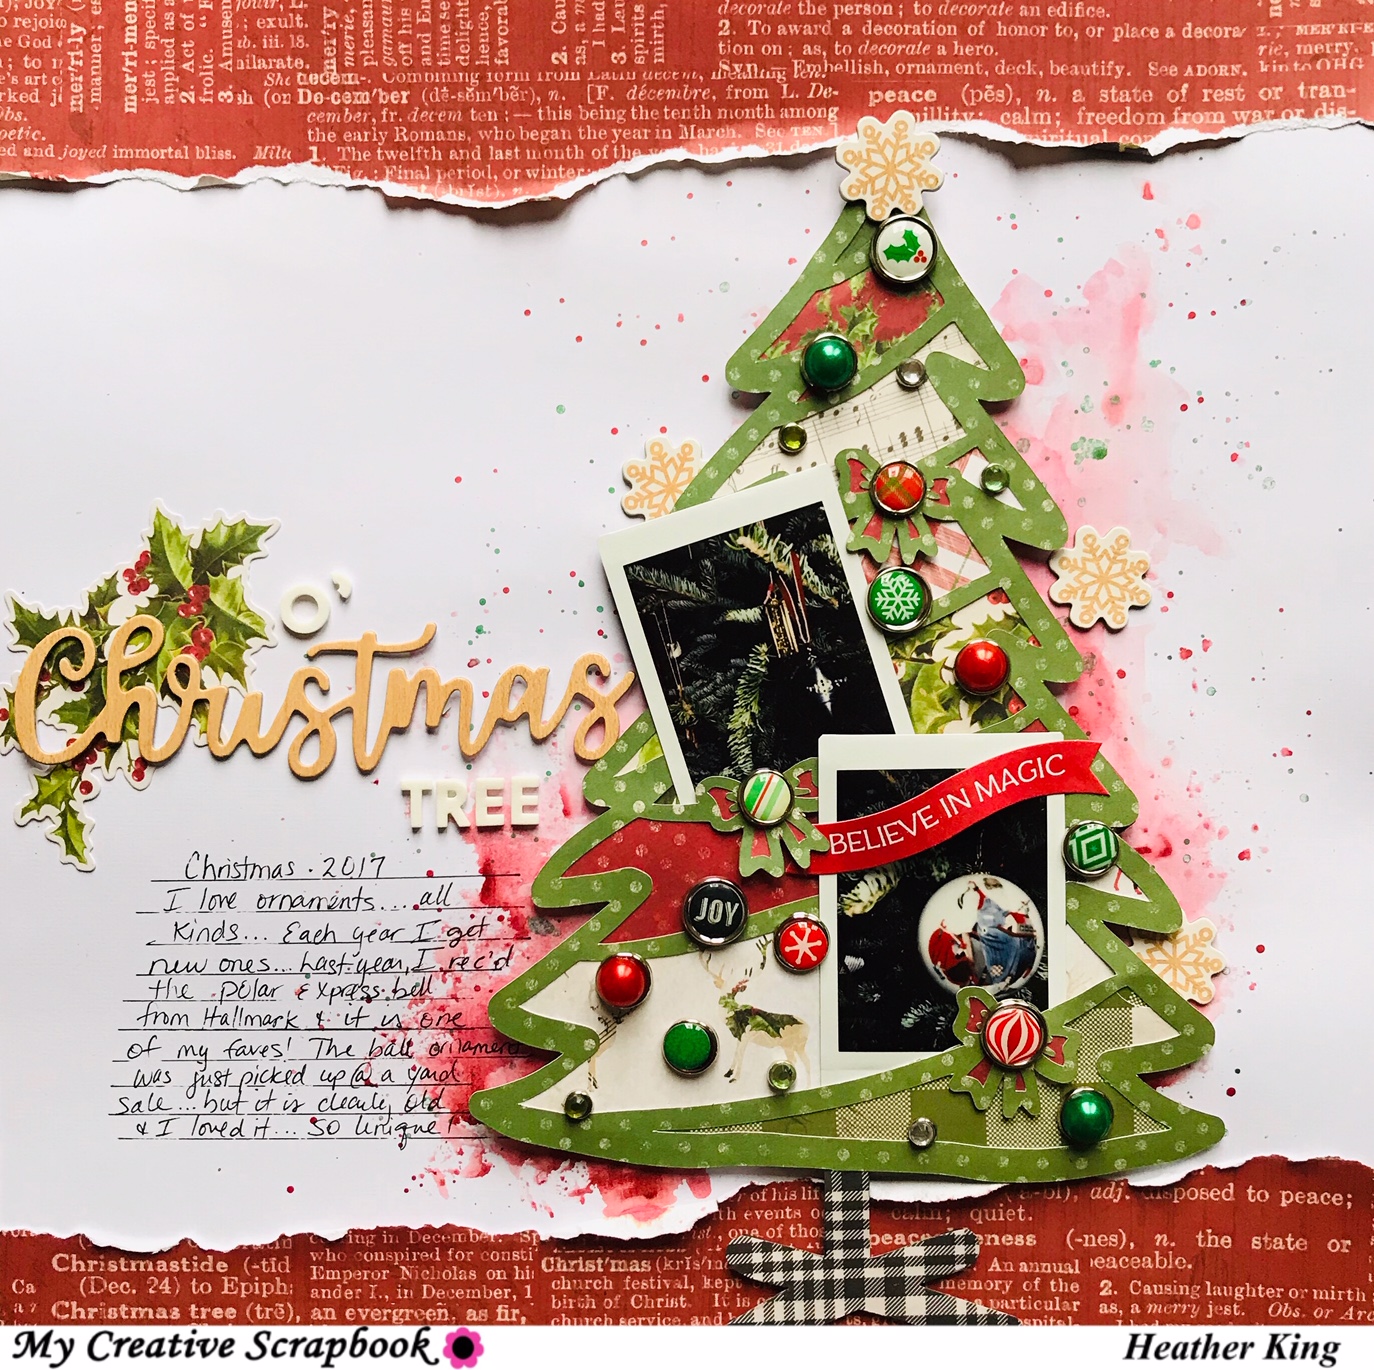
My 3rd layout was so much fun to create and may have been partially due to the story behind it...My husband gave me a polaroid camera for last year which was so exciting so I was taking pictures of all sorts of things with it...a couple of those pictures were of my new ornaments.  Each year, I receive new ornaments from my mother or I've purchased myself, but I cherish my ornament collection so it was appropriate to document!
Before adding the "Christmas tree", I added a layer of clear gesso to my white cardstock and smooshed some watercolors from my stash for some color peeking from behind the tree.  I used paints from Shimmerz, Hero Arts, and Kuratake Gansai.
Since one of this months exclusive cut files was a tree, I thought it would be fun to tuck in my ornament pictures.  I backed the open areas with patterned paper and then adhered most all of the Echo Park brads included in the kit.  I don't use brads often anymore (which I am sure is the case for most of us ...?)
but the idea of using the brads as other "ornaments" was very exciting!
To balance all of the open space in the background, I tore some of the red patterned paper and distressed it some to add to the top and bottom of the page.  Of course, since there was a long sentimental story to this layout, I had a lot to say in my journaling and the title says it all, right?
I used a large chipboard word from the kit and the white thickers are from Paige Evans from my stash.  I love how it turmed out!!
 
 
****************************************************************
 
My 4th layout was my most time consuming layout of the four, but my favorite!  It is of my daughters holding their new ornaments of the year which is kind of an extension of the story from my 3rd layout...can you tell our ornaments are huge in my family??
That being said, I had a lot of journaling for this one as well, but since the layout was about ornaments, I thought I would break out my paper punches (yep, I said punches!!) to create little embellishments "ornaments" to "hang" on my page....I used the red and green ribbons included in the kit to make bows for each ornament and really thought the hand stitching made it complete!  I used coordinating colors of embroidery floss and the chain link stitch to create all of this beautiful texture....My inspiration behind the stitching is definitely, Paige Evans...I have been sewing for years, but after watching video after video of Paige Evans hand stitching on her layouts, I thought, I can do this!  I learned this type of stitch from her as well and she has several videos on her YouTube channel explaining the process. Once you've done it a couple of times, it is easy ad anyone can do it...and floss is cheap and lasts a while, so if you haven't tried it...go ahead and experiment.  
You can start small with simple shapes like this one and I am sure you will be hooked!
 
Each ornament has a combination of die cuts and chipboard embellishments which some I've popped up on adhesive foam and most all, I used my Nuvo shimmer pen to add some sparkle..because everything looks better with sparkle!
 
Lastly, I wanted to added a little bit of "shine" coming from each ornament which I added with watercolors from my stash....I think the background was too white for my taste anyway!
My title came from the echo park chipboard in the kit and I added some white thickers from Paige Evans from my stash.
 
I do have a YouTube process video for this layout if you'd like to watch...click below...


Thanks for sticking with me till the end...I hope enjoyed looking through my projects for this months kit from My Creative Scrapbook.  Maybe you found some inspiration of your own....?
You can also find more ideas and inspiration from the other designers in the gallery on the website and you can see the complete details of each kit's contents as well.
 
Please free to leave me any comments or questions and then head over to My Creative Scrapbook Kit Club to sign up for next months kits!!
Happy Holidays and have a great crafty week!
 
hugs, Heather


Friday, November 16, 2018

Happy News + new scrapbook layout share!

 
Hey friends...yes, I know its, been quite a while since I posted, but I have still been busy creating and I have some new projects and news to share!
Recently, I was asked to be a guest designer for My Creative Scrapbook Kit Club for the next few months! yes, I know, awesome...I am very excited to be receiving their kits....They offer several different kits featuring different products that really cater to different scrapbookers...personally, I love each type of kit, but there is something for everyone!
 
Each month, I will be sharing a minimum of (4) projects using the Main Kit and the November kit was packed with Pebbles "Along the way" collection.  I love the papers and die cuts in this collection. 
The main kit also includes alpha stickers and some ribbon trim which I was definitely able to incorporate!
Below is one of the layouts I created...and actually it was the fourth layout I created, but this was my favorite and I recorded this one so you could see the process and how I created the background.


Make sure you check out my YouTube video linked below to learn how to create this quilted background!
 
 
 This is layout #2....I didn't use as much patterned paper and embellishments for this one, but I did use one of the exclusive sets of free cut files offered this month...I backed the flowers with patterned papers and vellum from my stash.  I layered some of them and used my sewing to stitch threw them in order for the edges to lift.  I also incorporated some of the matching die cuts and used the gold thicker word as my title.
I did use white gesso to white out the center of the black patterned paper so the flowers would stand out more and I could add some watercolors.  Then, I finished it off with lots of matching splatters.


This is layout #3....and I created this layout based on the monthly sketch provided as inspiration....It isn't an exact take on the sketch, but it got me going and that's all that matters!

 
I started with the branding strips from all of the lovely patterned papers in the kit and I knew I wanted to use the die cut circle, that has "love begins at home" on it.  From that, I pulled out and fussy cut any of the houses I found and thought it would be fun to layer them horizontally with my photo.
I machine stitched through each strip along the bottom and added a layer of white gesso on the background paper in order to add a little mixed media behind my photo.
 

My last layout using the main kit also uses another exclusive free cut file offer by My Creative Scrapbook Kit Club. The cut file actually started as a doily shape, but I removed the outer cut border in order to keep the shape in the white cardstock.  This allows me to back it with some beautiful patterned papers. 
For a border for the layout, I gutted one of the gorgeous floral papers so it appeared as though it was a frame....I add some machine stitching for texture and then started adding embellishments to coordinate with each color doily.
This picture is of my daughter and husband and it was taken before her first band concert.  That said, there was a program for the event that I wanted to include with my journaling, so I tucked it in behind my photo with some die cut tags from the kit.  To finish up, I added some splatters and my title using the alpha stickers from the kit.


Thanks so much for checking out my projects this month for My Creative Scrapbook Kit Club.  I love the way they turned out and hope you are inspired to try some of these techniques on your next project.  Also be sure to check out the different kits available this month...before you know it, it will be December and they will be gone so don't miss out!
Have a great week! 
 
xoxo Heather

December Kit share - My Creative Scrapbook Kit Club/main Kit

Hey my friends....Happy new year!! I realize this post is a little late, but I have been spending time with my family and working on new co...